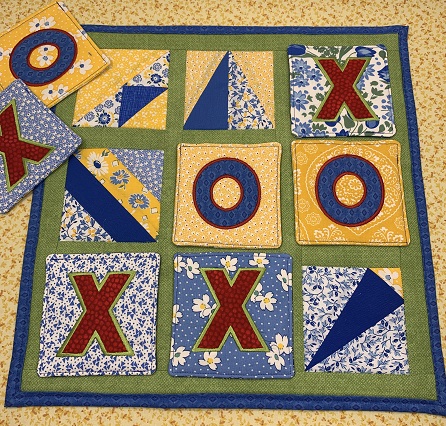
A sampler quilt block table topper that doubles as a Tic Tac Toe game board. A great project for left over 5”x5” charm pieces and 2.5”x42” strips from jelly rolls. Basic sewing skills are needed to finish the topper. The machine embroidery technique for this project is ITH pieced quilt block. The stitching guide on your machine is very helpful when making the blocks. The topper is made of nine ITH Pieced Quilt Blocks. Two of the patterns have been used twice. The easiest blocks to make are the Half Square Triangle and the String Line. The most complicated block is the Gaggle of Geese.
Step 1:
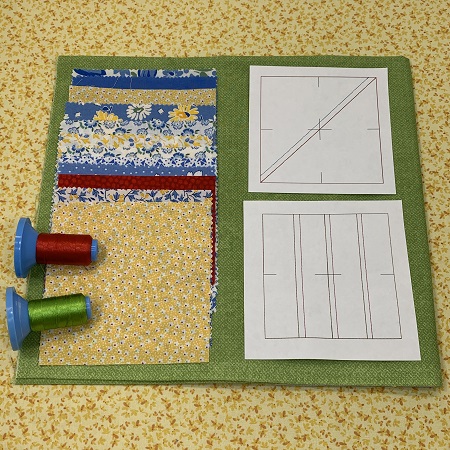
Read the directions before beginning the project. Gather the materials needed for the project. Iron and lightly starch the fabric pieces. Wait until you have finished sewing the blocks together before cutting the backing, sashing, or batting for the topper. Your final topper size may be different than the sample project.
Step 2:
Steps for each block:
Tautly hoop one piece of No Show poly mesh stabilizer.
Load the quilt block design.
Check the stitch guide on your machine for each color stop.
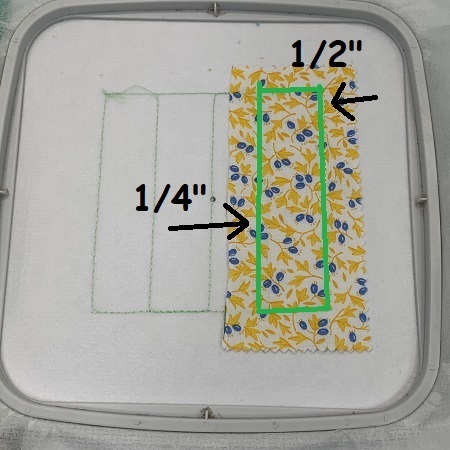
Leave a 1/2" margin for sewing the blocks together.
Leave a 1/4" margin when trimming fabric within the blocks.
Color Stop 1 (CS1) will always stitch an outline of the quilt block.
Without un-hooping, press seams with a small craft iron after folding over the fabric for each piece.
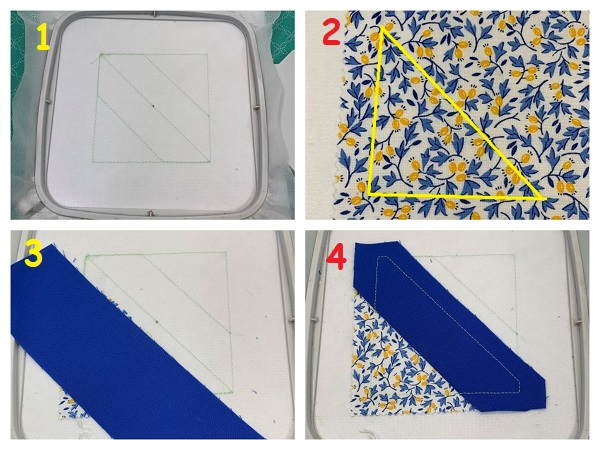
BLOCK 1: Fence Rail Quilt Block
Stitch CS1. Remove the hoop from the machine.
Step 3:
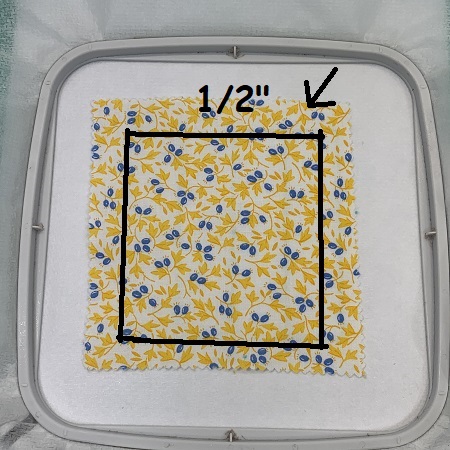
Place a piece of fabric over the whole block. Leave a 1/2 seam allowance around the fabric edges when placing fabrics. You will need this seam allowance when sewing the blocks together.
Step 4:
Stitch CS2. Remove the hoop from the machine. When trimming excess fabric, leave 1/2" for the seam allowance on the outer edges. Trim 1/4" from the seam line inside the block. You will do this fabric allowance for each block.
Step 5:
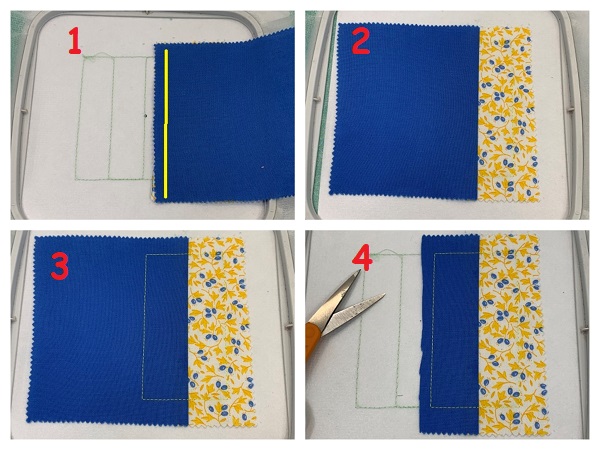
1. Place a piece of fabric RIGHT side down on the seam line. Stitch CS3.
2. Remove the hoop from the machine. Leave the block in the hoop. Fold over the fabric so the right sides are facing you. Carefully press the seam line on the piece you just sewed with a small craft iron and pressing mat. Keep the stabilizer taut. Re-attach the hoop.
3. Stitch CS4. Remove the hoop from the machine. Do not un-hoop. This step tacks down the fabric.
4. Remove the hoop from the machine. Do not un-hoop. Trim the excess fabric on the seam line to 1/4".
(Click Image to Enlarge)
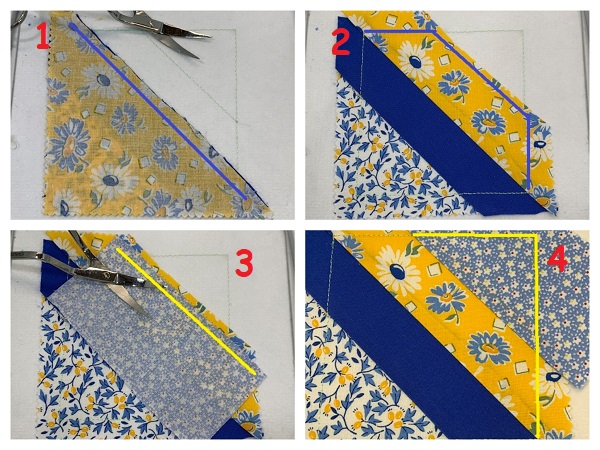
Step 6:
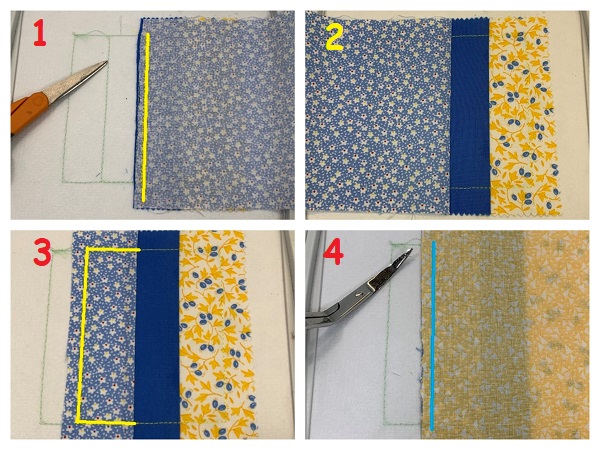
1. Place the next piece of fabric on the seamline. Stitch the next CS. Remove the hoop. Trim the seam line leaving 1/4" margin.
2. Fold the fabric over and press with an iron. Re-attach the hoop.
3. Stitch the next CS. This step stitches down the fabric piece. Remove the hoop. Trim the seam line leaving 1/4" margin. Re-attach the hoop.
4. Place the next piece of fabric on the seamline. Stitch the next CS. Remove the hoop. Fold over the fabric and press with an iron. Re-attach the hoop. Stitch the next CS.
(Click Image to Enlarge)
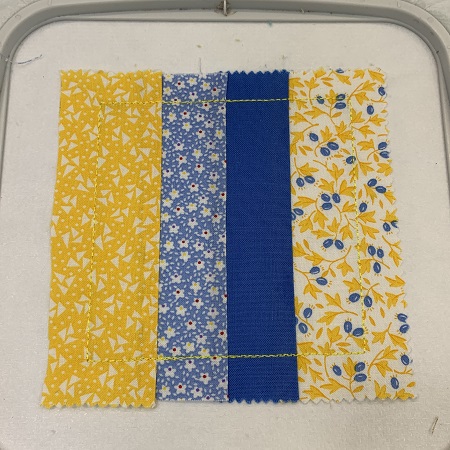
Step 7:
The last color stop for each block stitches around the sides of the block. Remove the hoop from the machine. Take the block out of the hoop. You have completed piecing the ITH Fence Rail Quilt Block 1.
Step 8:
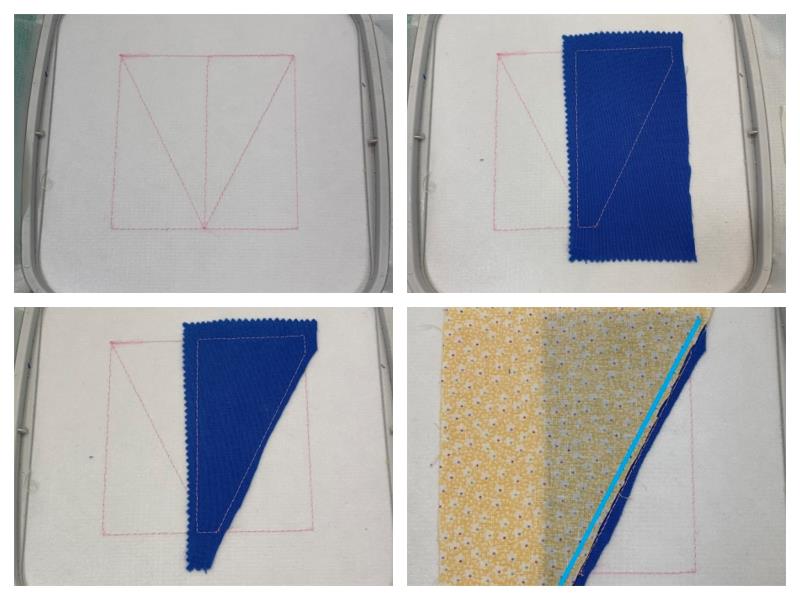
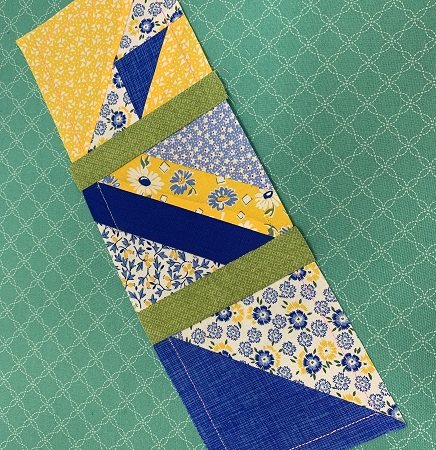
Block 2: String Line or Diagonal Strip Block
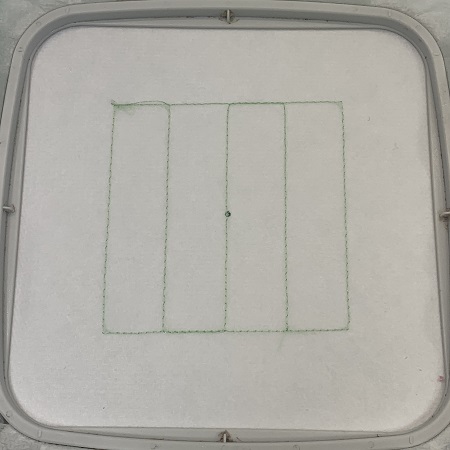
1. Hoop 1 piece of stabilizer. Load the block design on your machine. Stitch CS1. CS1 is the placement stitches.
2. Remove the hoop from the machine. Look at the stitch guide on your machine. It should show you where to put the first block. A jelly roll strip worked really well for this block. Place the fabric over the lower left corner. Remember to leave 1/2" margin for the seam allowance. Stitch the next CS. Remove the hoop from the machine. Trim excess fabric leaving a 1/4" margin. Attach the hoop.
3. Place the next piece of fabric with the RIGHT side down on the seam line. Stitch the next CS. Remove the hoop from the machine. Fold the fabric over and press with an iron. Re-attach the hoop.
4. Stitch the next CS. This CS stitches down the piece you just sewed.
(Click Image to Enlarge)
Step 9:
1. Place the next piece of fabric with the RIGHT side down on the seam line. Stitch the next CS. Remove the hoop from the machine. Trim the seam line leaving a 1/4" margin. Fold the fabric over and press with an iron. Re-attach the hoop.
2. Stitch the next CS. This CS stitches down the piece you just sewed.
3. Place the next piece of fabric with the RIGHT side down on the seam line. Stitch the next CS. Remove the hoop from the machine. Trim the seam line leaving a 1/4" margin.
4. Fold the fabric over and press with an iron. Re-attach the hoop. Finish stitching the block. You have completed piecing the ITH Diagonal pieced quilt block.
(Click Image to Enlarge)
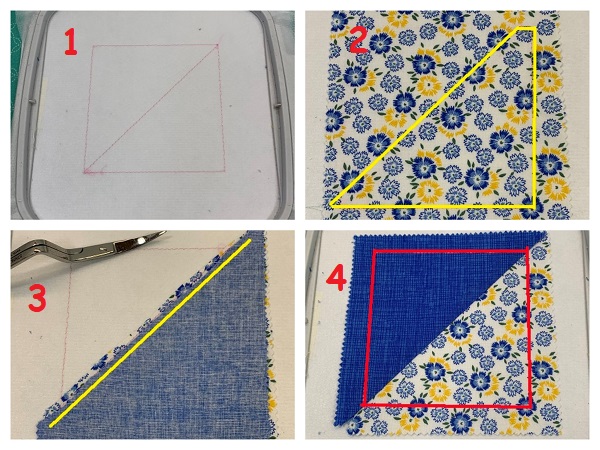
Step 10:
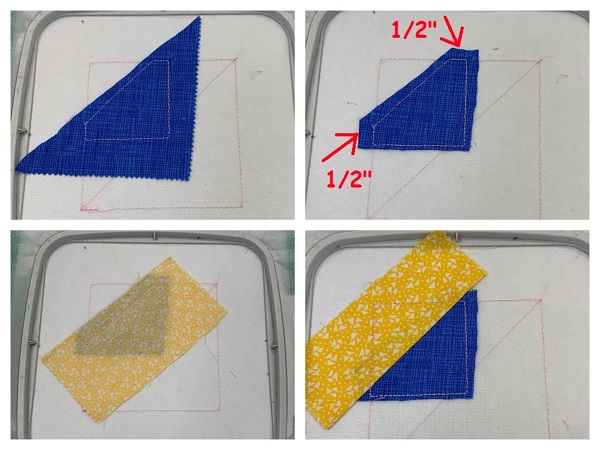
Block 3: Half Square Triangle
1. Hoop the stabilizer. Load the half square triangle block. Stitch CS1.
2. Place a piece of fabric over the placement stitches. Remember to leave a 1/2" margin for a seam allowance. Stitch the next CS. Remove the hoop. Trim the excess fabric leaving a 1/4" margin from the seam.
3. Place the next piece of fabric with the RIGHT side down. Stitch the next CS. Trim the excess fabric leaving a 1/4" margin from the seam.
4. Remove the hoop. Fold the fabric piece over. Press with an iron. Finish stitching the block. Remove the hoop from the machine. You have completed an ITH Half Square Triangle pieced quilt block.
(Click Image to Enlarge)
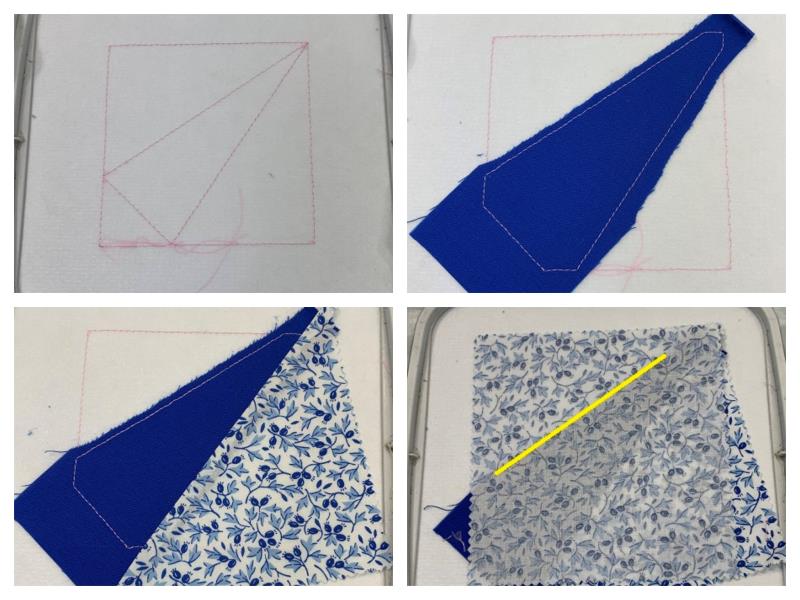
Step 11:
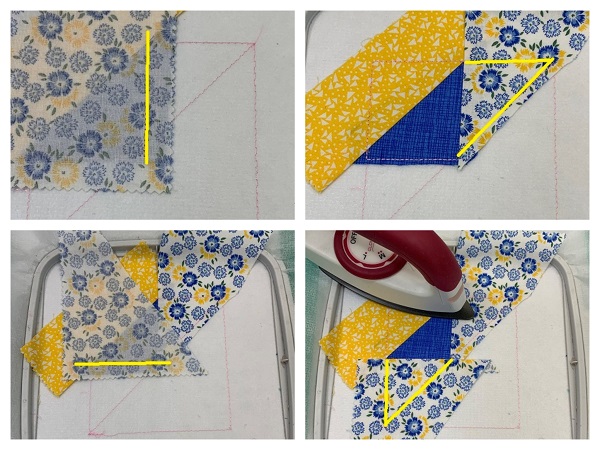
Block 4: ITH Pieced Block
Follow the basic process listed in Step 2 for making the blocks. Tautly hoop one piece of No Show poly mesh stabilizer. Use the stitch guide for each step in the block. Remember to leave 1/2" seam allowance on the outer edge of the block. Trim seams to 1/4" within the block. Press seams with a small craft iron.
(Click Image to Enlarge)
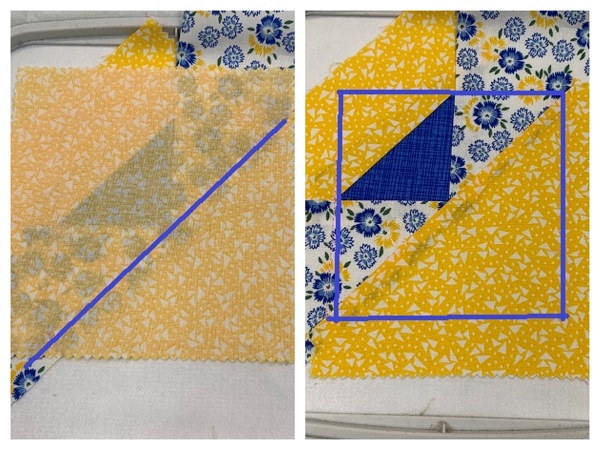
Step 12:
Finish Block 4.
(Click Image to Enlarge)
Step 13:
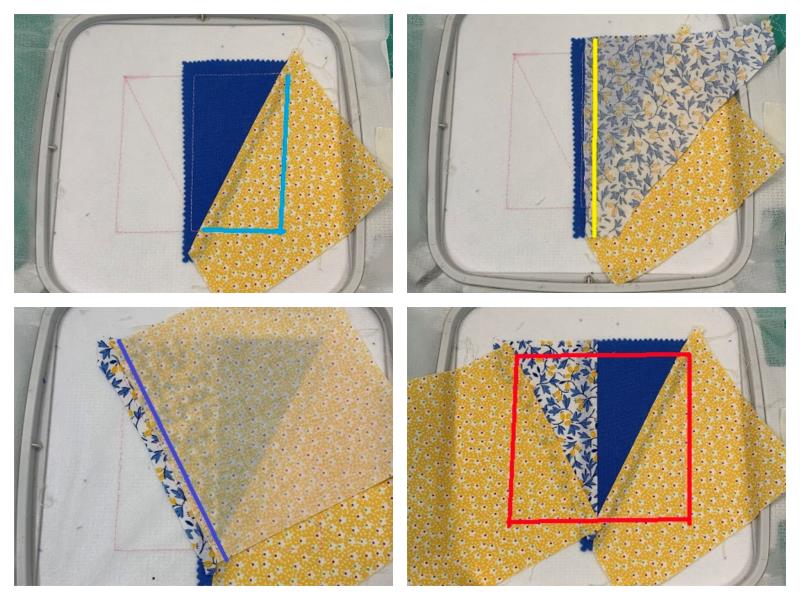
Block 5: ITH Pieced Quilt Block
(Click Image to Enlarge)
Step 14:
Continue with Block 5.
(Click Image to Enlarge)
Step 15:
Complete Block 5.
(Click Image to Enlarge)
Step 16:
Block 6: ITH Pieced Quilt Block
(Click Image to Enlarge)
Step 17:
Complete Block 6 ITH Pieced Quilt.
(Click Image to Enlarge)
Step 18:
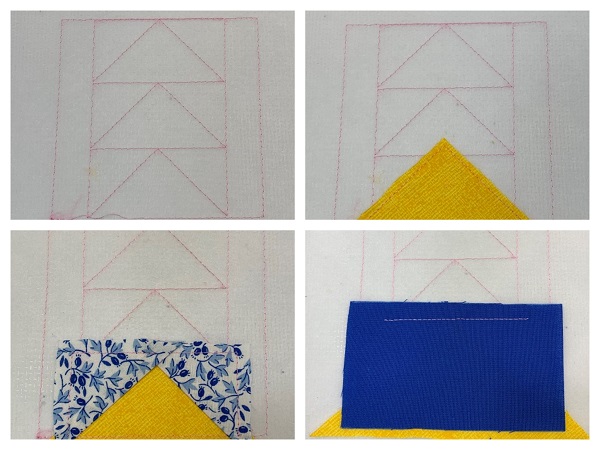
Block 7: ITH Gaggle of Geese Quilt Block
Begin Block 7. Follow the basic basic process found in Step 2.
(Click Image to Enlarge)
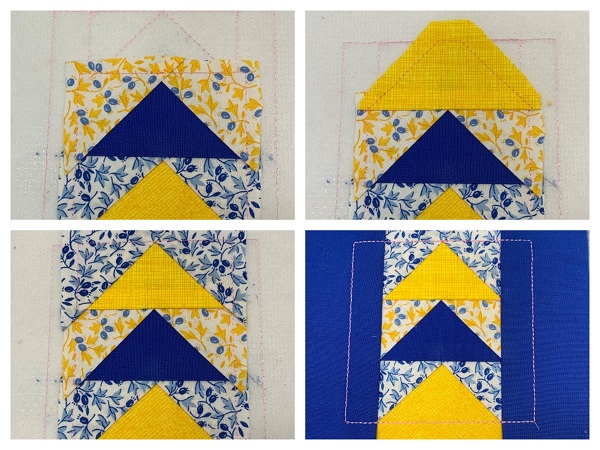
Step 19:
Complete the Gaggle of Geese Quilt Block.
(Click Image to Enlarge)
Step 20:
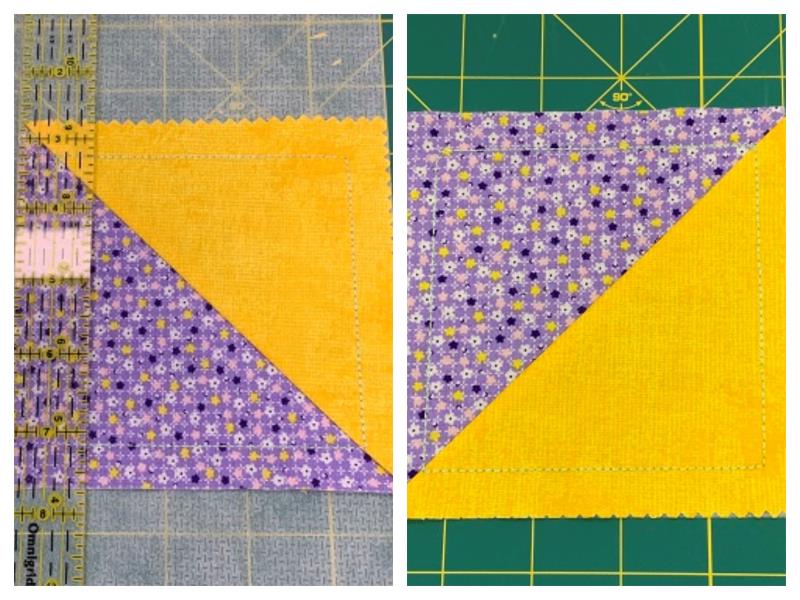
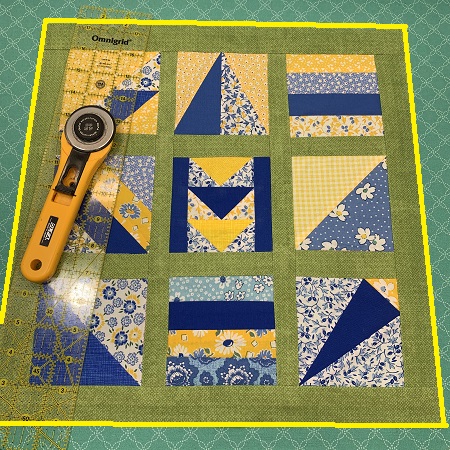
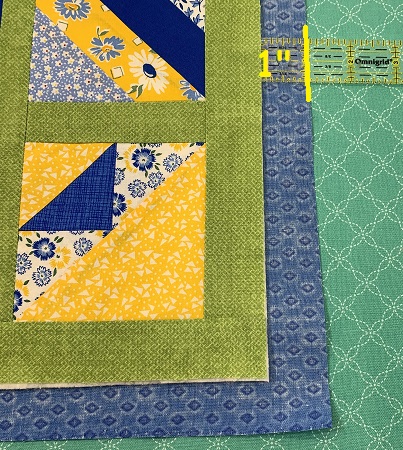
Squaring up the blocks. Trim the quilt blocks so they have straight edges and true 90-degree corners. Leave about 1/2" of fabric for a seam allowance.
(Click Image to Enlarge)
Step 21:
Sashing
Lay out the blocks on a flat surface. Measure the length of your blocks.
Cut six pieces 2" x length (approx. 2"x6").
Create a grid using the fabric strips. Measure the length row with the sashing between the blocks. Cut two pieces 2" x width (approx. 2"x16").
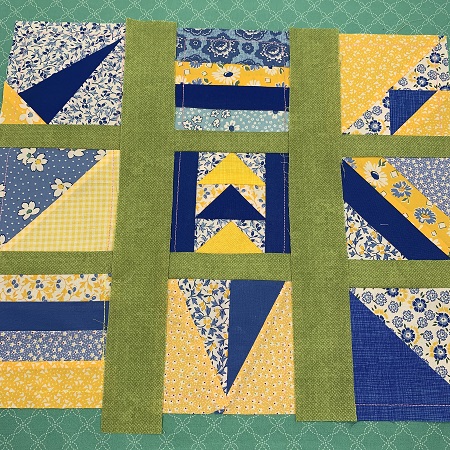
Step 22:
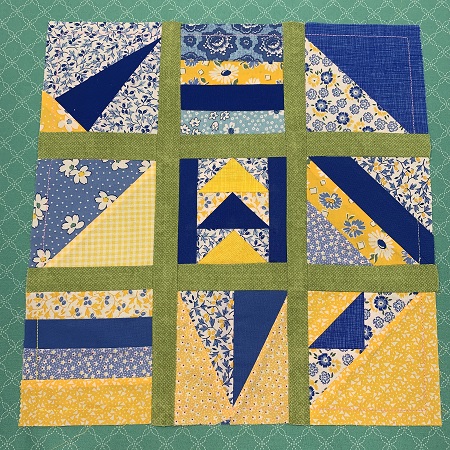
Sew the 2"x6" sashing pieces between the blocks. Use a 1/4" seam allowance. Reinforce the stitches at the beginning and end of the seam. When finished, you will have 3 strips of blocks sewn together.
Step 23:
Sew the 2" x 16" strips between the 3 block strips.
Step 24:
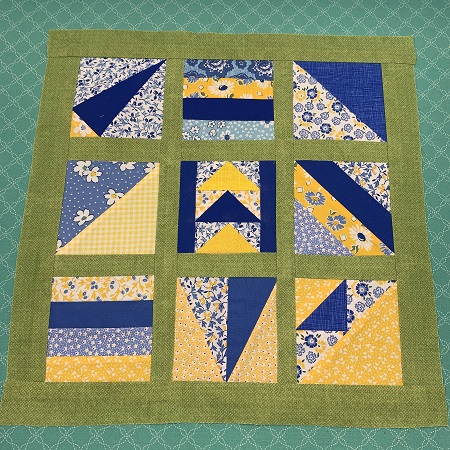
Add a 2" x 16" strip to the outside of the blocks to make a border. Use a 1/4" seam when sewing. Reinforce stitching at the beginning and end of the seam.
Step 25:
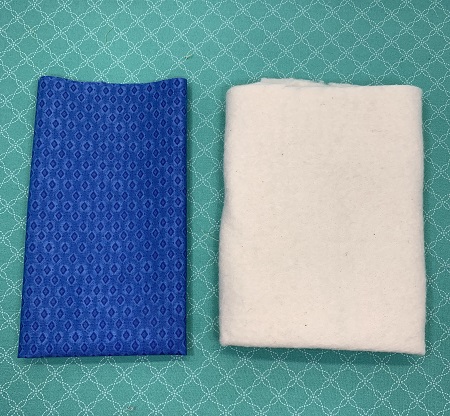
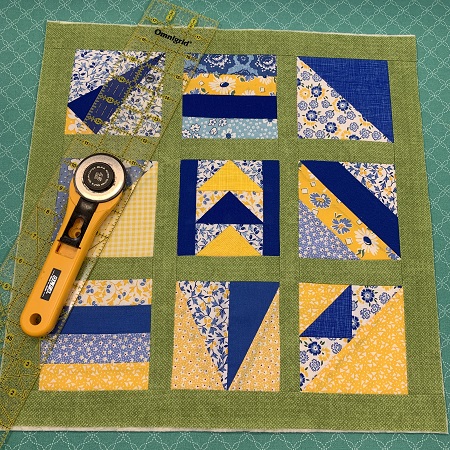
Batting & Backing
Square the sides of the topper. Trim the quilt blocks so they have straight edges and true 90-degree corners. Measure the length & width of the topper. It should be approximately 16"x16" in size. Remember that sizes may vary.
Step 26:
Cut one piece of low nap batting the size of the finished topper (approx. 16"x16"). Cut one piece of the backing fabric 18"x18". You need to make the backing piece 2" larger for the binding. (Measurements are for the sample topper. Your topper size may be different.)
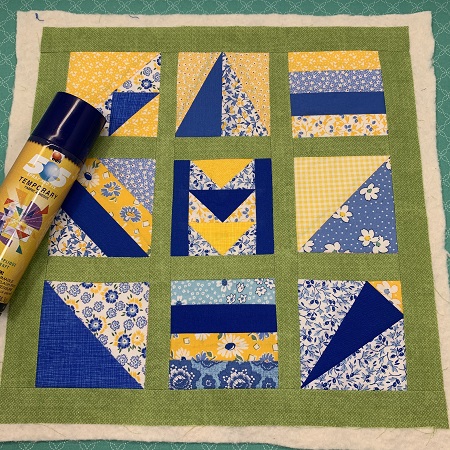
Step 27:
Lay the low nap batting on a flat surface. The batting top must be smooth and wrinkle free. Lightly mist the batting with 505 Temporary Adhesive spray. Place the topper on the batting. Smooth the surface of the topper.
Step 28:
Trim extra batting if needed to match the topper size.
Step 29:
Lay the backing fabric on a flat surface. Lightly spray the backing with a temporary adhesive spray. Place the topper on the backing fabric. You should have a 1" overlap of the backing fabric. Pin the 3 pieces (topper, batting, & backing) together.
Step 30:
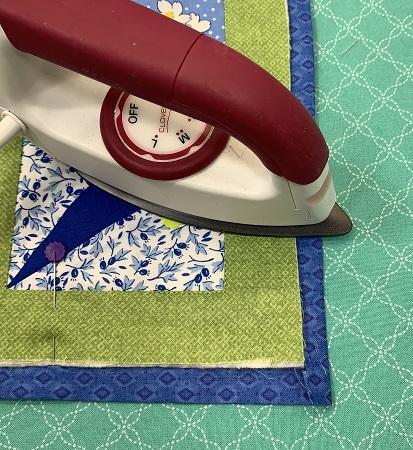
Fold the backing fabric over 1/2". Press with an iron.
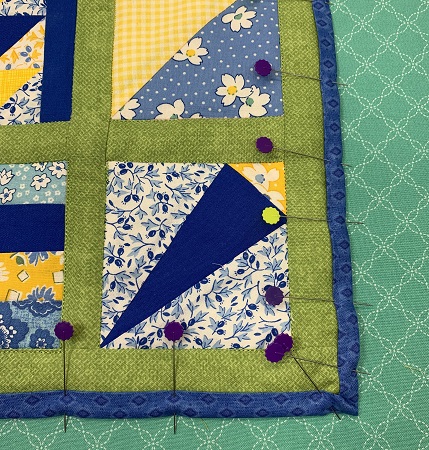
Step 31:
Fold the trim over again. Pin in place. Topstitch around the edge of the binding.
Step 32:
Topstitch around the edges of each block. You did it! You have completed a Sampler Table Topper. Next, make the Tic Tac Toe game pieces.
Step 33:
Tic Tac Toe game pieces
You will follow the same steps to make all the pieces. You need to make 5 each of the 'O' and the 'X'.
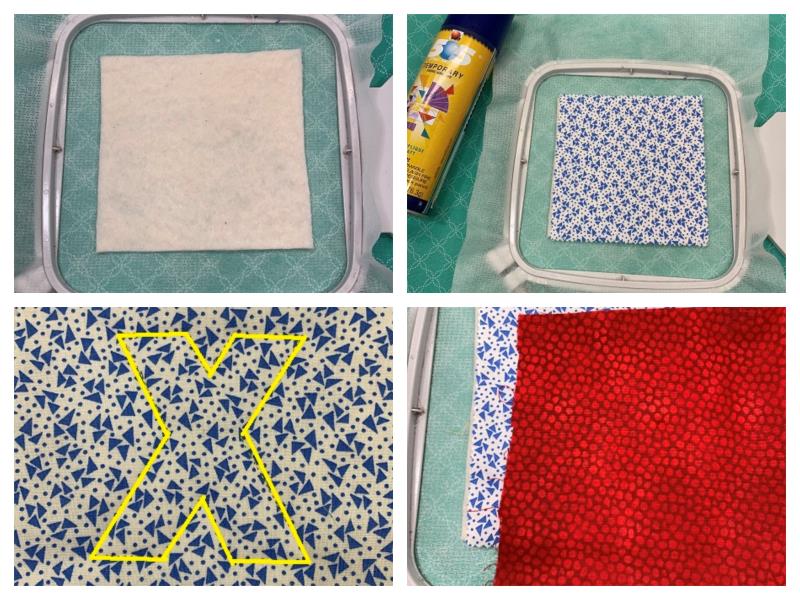
Tautly hoop one piece of No Show poly mesh stabilizer.
Lightly mist the stabilizer with temporary adhesive spray.
Place one 5"x5" piece of low nap batting in the center of the hoop.
Lightly mist the top of the batting with temporary adhesive spray.
Place one 5"x5" piece of fabric on the batting. Attach the hoop.
The first color stop is the placement stitch for the appliqued 'O' or 'X'.
Place a 5"x5" piece of fabric over the placement stitch.
(Click Image to Enlarge)
Step 34:
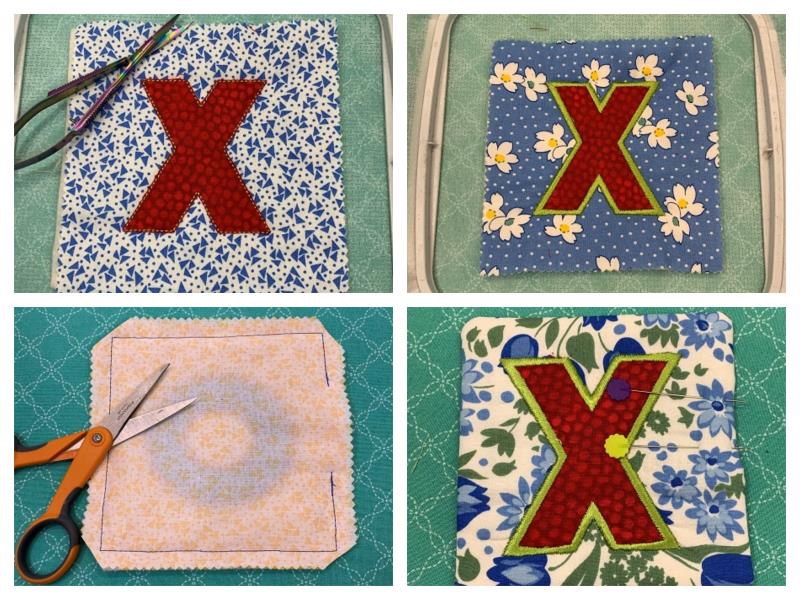
Re-attach the hoop. Stitch the next CS.
Remove the hoop and trim excess fabric from around the letter. Re-attach the hoop. Finish the design.
Trim stabilizer from around the block.
Place a 5"x5" fabric piece over the block. Pin right side together. Sew a 1/4" seam leaving a gap for turning the block.
Clip the corners before turning the block. Pin the opening together.
Topstitch around the edge of the block.
Repeat these steps for each game piece.
(Click Image to Enlarge)
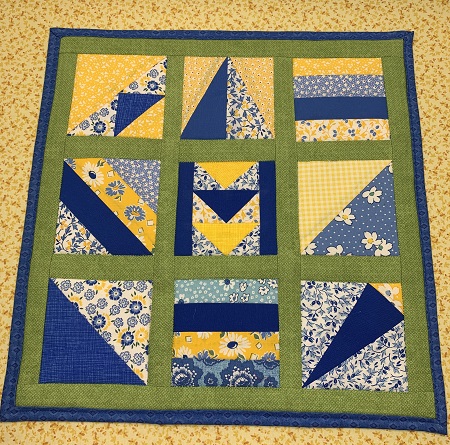
Step 35:
Congrats! You have completed a sample ITH Pieced Table Topper. AND made game pieces so you can use it as a TIC TAC TOE game board! You did awesome! Have fun!
(Click Image to Enlarge)
Beautiful things are made, one stitch at a time...
Marisa Littleton is a retired educator with a love for teaching and learning. Interests include machine embroidery, hand embroidery, quilting, cooking, and antiques.