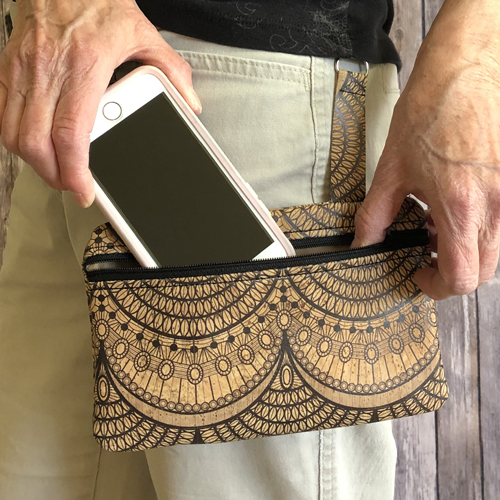
Stylish, useful, fully lined ITH Cork Hip Bags are so easy to stitch up. They attach to the belt loops of your jeans or pants. These are great for hiking or trips to the grocery store.
Quality cork fabric is fun to work with but known for how expensive it can be. The online store Fabric Funhouse has these wonderful printed and plain cork fabrics available in small pieces to make these projects very affordable. Due to the wonderful prints available there are not any embroidered designs in the fronts of these bags. You can also use these designs to make these bags from quilting cotton or recycled denim. If you decided to do that prepare your outer fabrics by fusing a light- weight interfacing to the fabric before cutting. The large bag will hold your large cell phone, hand sanitizer, your driver’s license and debit card. The smaller bag will hold a small phone and the other items mentioned. The instructions and pictures below are for the larger bag, the smaller bag is made using the same steps.
Step 1:
The sample shown in the photos is the larger bag cut the fabric pieces for it as follows:
a. Cork fabric and lining 10” wide and 7” deep for the back
b. Cork fabric and lining 10” wide and 5” deep for the lower front
c. Cork fabric and lining 10” wide and 2” deep for the upper front
d. 2 Cork fabric 7” x ¾” strips for the straps
e. No-show stabilizer to fit your hoop
For the smaller bag cut:
a. Cork fabric and lining 8” wide and 6” deep for the back
b. Cork fabric and lining 8” wide and 4.5” deep for the lower front
c. Cork fabric and lining 8” wide and 2” deep for the upper front
d. 2 Cork fabric 7” x ¾” strips for the straps
e. No-show stabilizer to fit your hoop
(Click Image to Enlarge)
Step 2:
Prepare the straps at your sewing machine by feeding the strip of cork fabric right side out through the swivel key fob base. Align the bottoms of the strip and stitch across ¼” from the bottom. Repeat for the 2nd strap.
Step 3:
Move the key fob base to the end of the strap, stitch across the strap as close to the key fob base as possible and then reverse across that whole stitched line. Repeat for the other strap.
(Click Image to Enlarge)
Step 4:
Run color stop (CS) 1 in a color to match your bag as an outline of the bag and a placement line for the zipper. Note you can use the same color thread throughout this project except where you are instructed to use a contrast thread for the handle placement lines.
(Click Image to Enlarge)
Step 5:
Align the zipper over the three placement lines. The zipper is place right side up with the zipper pull to the left-hand side of the bag and should extend a couple of inches past the bag outline. The right-hand end of the zipper should also be a couple of inches beyond the bag outline. Center the zipper so that the actual zipper follows that center placement line. Using cellophane tape down both ends of the zipper outside of the stitching lines. Make sure it is taut across the center of the bag.
(Click Image to Enlarge)
Step 6:
Run CS 2 to tack down the zipper. You may use the same thread that is in your machine as contrasting thread is shown in the picture so that it can be seen in the photo.
(Click Image to Enlarge)
Step 7:
Remove the hoop from
the machine, do not unhoop, place the hoop face down on
a flat surface. Align the lower front lining fabric to the bottom edged
of the zipper, tape in place along both sides. It is also helpful to tape
the upmost edge of that fabric to the top side of the hoop so that it doesn’t
fall inside when the hoop is returned to the machine. If you lining fabric is a
print place is right side down.
(Click Image to Enlarge)
Step 8:
Turn
the hoop right side up. If using a cork
fabric with a directional print fabric it is wise to check the cork will be facing
the correct direction once it is sewn. Lay the cork on the lower front to
check its direction.
(Click Image to Enlarge)
Step 9:
Flip the cork over so the top edge of the lower front is aligned with the bottom edge of the zipper. Tape it into place along the sides.
(Click Image to Enlarge)
Step 10:
Run CS 3 to seam the cork, zipper and lining to the project.
(Click Image to Enlarge)
Step 11:
Remove the hoop from the machine, do not unhoop. remove the tape from the cork fabric, spray the lower front stabilizer with adhesive and smooth the cork down over the front. Take your time smoothing the cork over the stabilizer, it is a stiffer than regular fabric and you want to crease the cork over the seam line as closely and smoothly as possible. If you want to embroider on the front of the bag with something do it now. Then return to CS 4 on the bag design. See Step 12 before running CS 4.
(Click Image to Enlarge)
Step 12:
With the hoop still removed from the machine, turn the hoop over, spray adhesive on the back of the lower front section. Remove the tape from the lining fabric and smooth it down into position.
(Click Image to Enlarge)
Step 13:
Run CS 4 to topstitch the lower front and lining together.
(Click Image to Enlarge)
Step 14:
Remove the hoop from the machine, do not unhoop. On the back of the hoop align the bottom edge of the lining fabric, right side down, with the top edge of the zipper, tape along both sides.
(Click Image to Enlarge)
Step 15:
On the front of the hoop align the bottom edge of the cork fabric, right side down, with the top edge of the zipper. Tape both sides down.
(Click Image to Enlarge)
Step 16:
Run CS 5 to seam the cork and lining together.
(Click Image to Enlarge)
Step 17:
Remove the hoop from the machine, do not unhoop, spray adhesive on the stabilizer at the top of the bag. Smooth the cork fabric over the stabilizer.
(Click Image to Enlarge)
Step 18:
Repeat Step 17 on the back of the hoop to smooth the lining to the top of the bag.
(Click Image to Enlarge)
Step 19:
Return the hoop to the machine and run CS 6 to topstitch above the zipper.
(Click Image to Enlarge)
Step 20:
Remove the hoop from the machine, do not unhoop. With small scissors or a sharp seam ripper remove the stabilizer from behind the zipper.
(Click Image to Enlarge)
Step 21:
Return the hoop to the machine and run CS 7 in a contrasting color to stitch two placement lines for the straps.
(Click Image to Enlarge)
Step 22:
A lot of critical things happen in this step. 1. Unzip the zipper about 3/4th of the way across the bag. Tape the two straps over the placement lines so that the stitching you did on the straps is just above the placement lines. Tape the swivel clasp ends to the inside of the bag so they don’t wander off towards the seam lines that will be sewn in the net two steps. Use cellophane tape for these steps as it is easier to remove later.
(Click Image to Enlarge)
Step 23:
Lay the cork back fabric face down over the front of the bag. If it is a directional print make sure the print is facing in the correct direction. Tape if down on all sides. Run CS 8 to stitch it down.
(Click Image to Enlarge)
Step 24:
Remove the hoop from the machine, do not unhoop. turn the hoop face down, lay the back lining piece face down over the project back. Tape down on all sides. Return the hoop to the machine and run CS 9 for the final seam. Remove the hoop from the machine and turn over, note the opening left in the back for turning.
(Click Image to Enlarge)
Step 25:
Remove the project from the hoop. Trim to ¼” seam allowances around the bag but leave ½” seam allowance over the open turning section. Clip around all the curves at the corners of the bag,
(Click Image to Enlarge)
Step 26:
The two layers of lining fabric are the only ones that need to be ½” in width across the opening of the bag. Lift those two layers and trim down the other fabric and stabilizer layers.
(Click Image to Enlarge)
Step 27:
Reach into the opening between the lining layers and pull the bag inside out using a point turner or chopstick to smooth out the corners.
(Click Image to Enlarge)
Step 28:
Turn the excess fabric to the inside of the bag, lining up the layers from the front and back, ladder stitch or whip stitch closed.
(Click Image to Enlarge)
Step 29:
Turn the bag right side out through the zipper. You can lightly press the bag to sharpen up the edges but use a wool or synthetic setting on your iron and place a pressing cloth over the whole bag while ironing.
(Click Image to Enlarge)
Step 30:
Congratulations your ITH Cork Hip bag is complete!
Step 31:
I must include a picture of the smaller bag completed too! I love this large print cork fabric on it reminds me of a Georgia O’Keeffe painting. I hope it inspires you to work with some of the larger cork print fabrics.
I must include a picture of the smaller bag completed too! I love this large print cork fabric on it reminds me of a Georgia O’Keeffe painting. I hope it inspires you to work with some of the larger cork print fabrics.
Award winning Digitizer, Embroidery Educator, Author and a Consultant to the Industry, Pat Williams has 30 years of experience in the embroidery industry. Pat has won multiple awards for her digitizing expertise including the 2007 Impressions Awards Grand Championship, Best of Show as well as the 1st and 2nd Place Awards. Pat’s love of digitizing has afforded her the opportunity to write numerous articles for Impressions magazine in the United States and Images Magazine in Europe. In 2001 Pat was named “Embroidery Educator of the Year.” For many years Pat taught digitizing seminars at the ISS Shows in Long Beach, CA and for Compucon software. She now resides in Tucson, AZ.