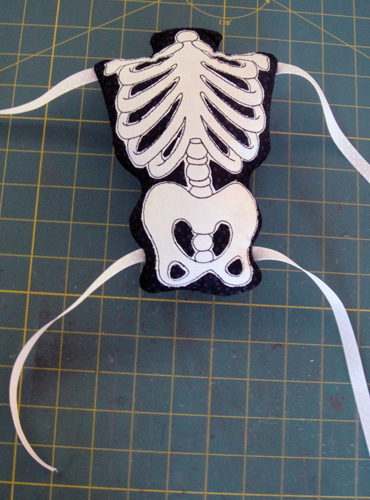
This fun to make skeleton’s bones and parts are all created in the hoop including the ribbons. Each part is closed and the head is attached to the body with hand sewn stitches. The limb bones are attached to each other and the body with bows.
All of the bones are raw edge appliques, so they are quick to apply to the background fabric. Each bone, including the ribbons, are made in the hoop. They are then turned, firmly stuffed, and stitched closed by hand. The use of a 2 ½” long doll needle makes it easy to stitch the head to the body. It is recommended that you attach each completed piece to the skeleton as you go to avoid mixing up the arm and thigh bones.
Step 1:
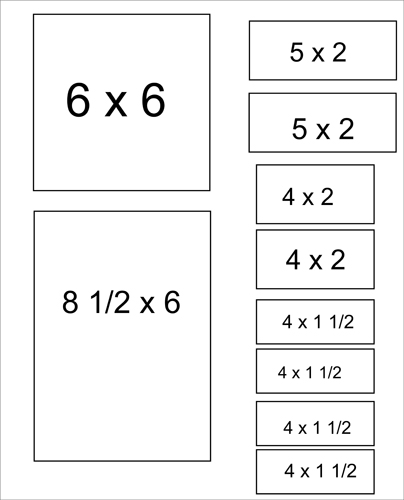
Press the Kona® cloth several times with Magic Sizing® to make it stiffer. Fuse the Heat N Bond Lite® to the back of the white Kona® cloth following the manufacturer’s instructions. Cut the fused fabric into the following sizes for the appliques: a. 6” x 6” for the face b. 8 ½” x 6 for the body c. 4" X 1-1/2” for the arms d. 2 4” x 2” for the thigh bones e. 2 5” x 2” for the feet
Step 2:
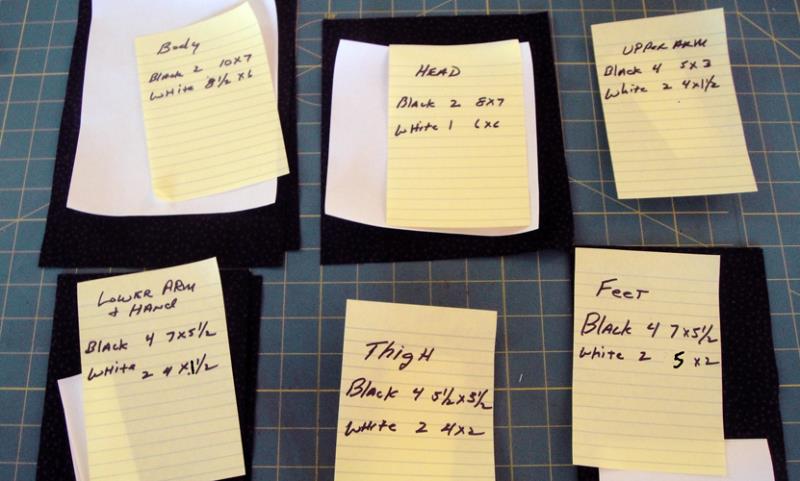
Cut the black fabric into the pieces for the body parts: a. 2 10 X 7 for the body b. 2 8” x 7” for the head c. 4 5” x 3” for the upper arms d. 4 7” x 5 ½” for the lower arms and hands e. 4 5 ½” x 3 ½” for the thighs f. 4 7” x 5 ½” for the lower legs and feet g. Also cut 16 8” strips of 3/8” white grosgrain ribbon Stack each set of black fabrics with the applique fabrics and label to keep them separated until needed.
(Click Image to Enlarge)
Step 3:
(Click Image to Enlarge)
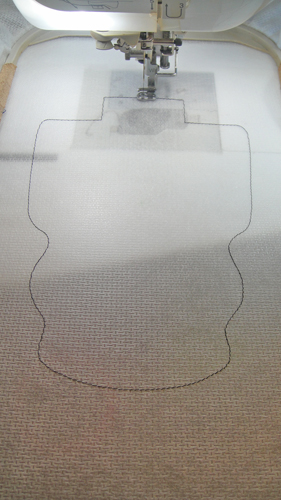
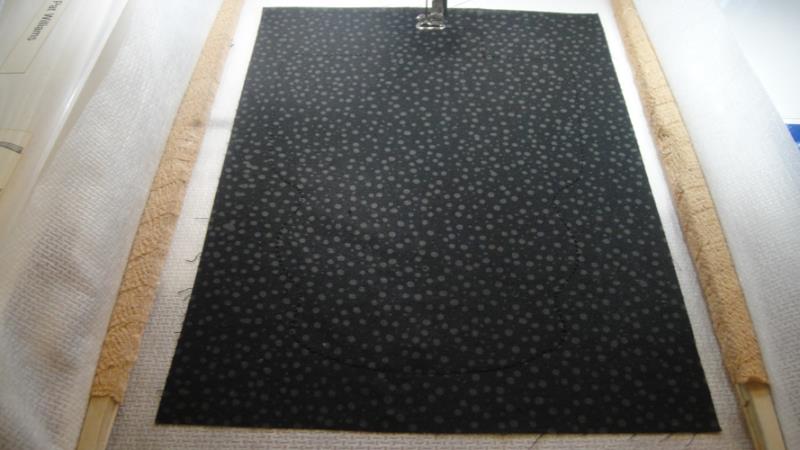
Tautly hoop no-show stabilizer in a 6” x10” or larger hoop. Load design SKEL10B in your machine and run the 1st color stop (CS) in black as a placement line.
Step 4:
Spray adhesive on the wrong side of your black fabric and position over the placement lines so that it exceeds the placement lines by ½” on all sides. Tack Down with CS 2.
(Click Image to Enlarge)
Step 5:
(Click Image to Enlarge)
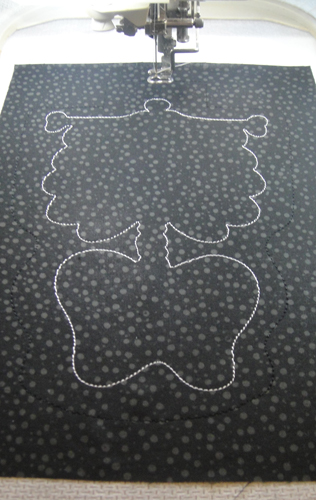
Run CS 3 in white as a placement line.
Step 6:
(Click Image to Enlarge)
Remove the Heat N Bond Lite paper from the back of the 8 ½” x 6” applique fabric, lightly spray the back with adhesive spray and position over the placement line. Run CS 4 in black to tack down the applique fabric.
Step 7:
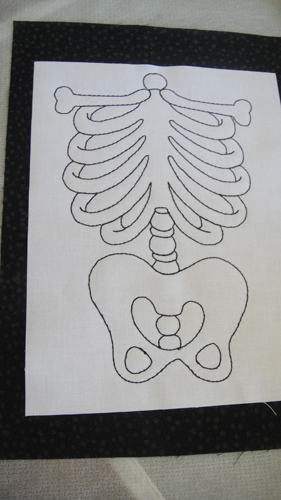
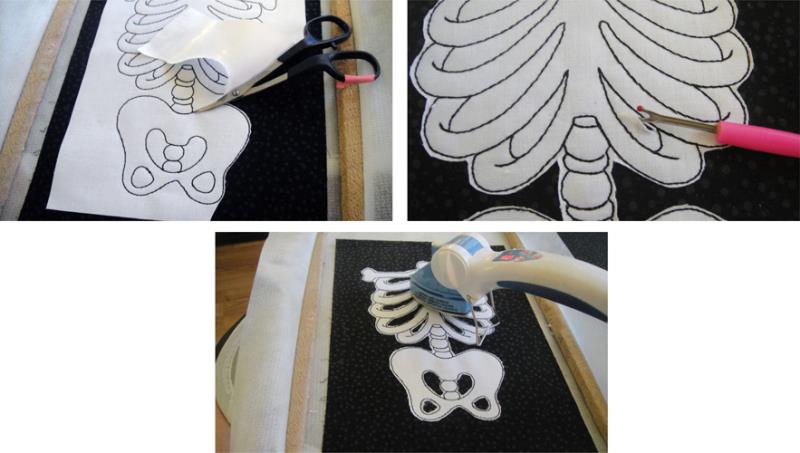
Remove the hoop from the machine, do not unhoop. Trim around the outside edge of the applique with about a 1 to 2mm margin. To trim out the inside pieces first use a sharp seam ripper to lift the applique fabric from the background. Once you have made a small slit in the applique fabric it is easier to insert your scissors and trim the remainder of the inside holes. Press the applique in place after the trimming has been completed.
(Click Image to Enlarge)
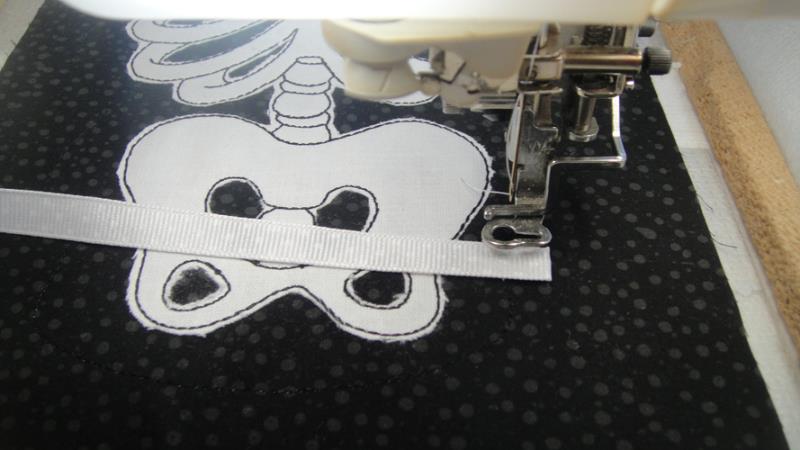
Step 8:
The next 8 color stops are placement lines and tack down lines for the ribbon. Each set sews individually. Run these in white. Run the 1st one; place the ribbon (face down if your ribbon has little dots or a pattern) about ¼” over the placement line. The longer length of the ribbon will be on the inside of the body the ¼” facing the outside of the body. Run the next color stop to tack down that ribbon. Repeat 3 times to attach 4 ribbons to the body.
(Click Image to Enlarge)
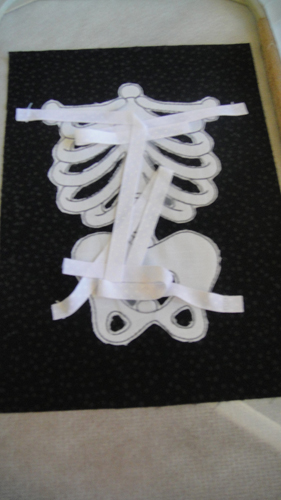
Step 9:
(Click Image to Enlarge)
Fold the ribbons into the inside of the body and hold in place with cellophane tape.
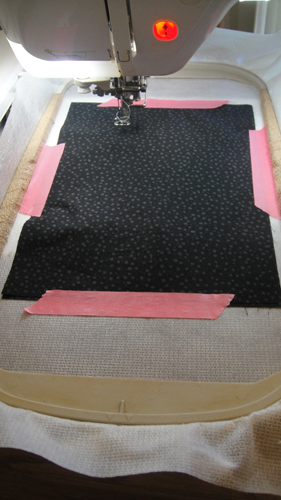
Step 10:
(Click Image to Enlarge)
Lay the corresponding main fabric, face down, over the body and hold in place with embroidery tape. Run the final seam in black thread.
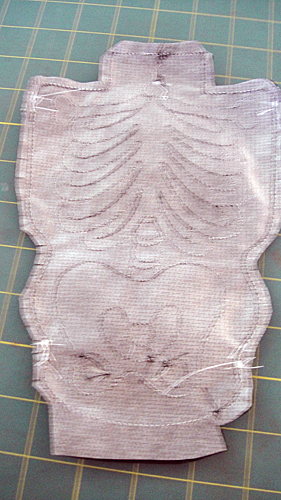
Step 11:
(Click Image to Enlarge)
Remove the project from the hoop. Trim from the back of the project where you can see the stitching lines better about ¼” from the final seam, but at the opening left for turning leave a ½” seam allowance. Clip all curves and trim the corners.
Step 12:
(Click Image to Enlarge)
Turn the body right side out; firmly stuff using small pits of stuffing at a time; turn in the seam allowances at the bottom. Close with a ladder or slip stitch.
Step 13:
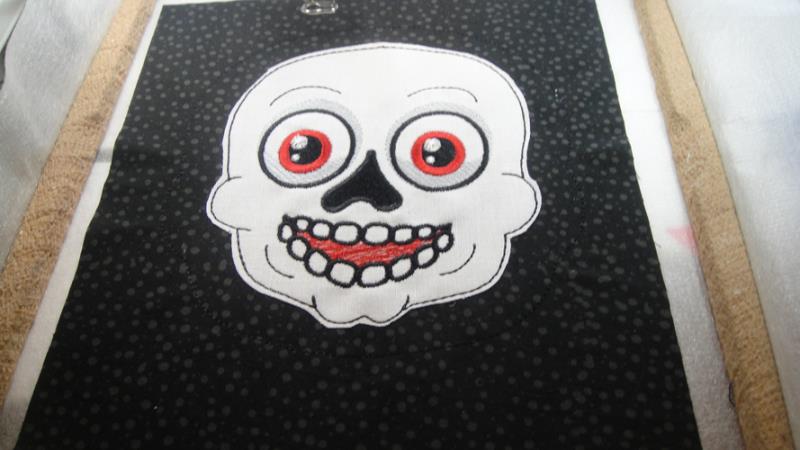
Design file SKEL02B is the head. Follow Steps 3 through 5 to place the applique follow the color chart for CS 5 through 9 to embroider the face. Tape the back fabric to the front as in Step 10 and stitch the final seam. No ribbons are attached to the head.
(Click Image to Enlarge)
Step 14:
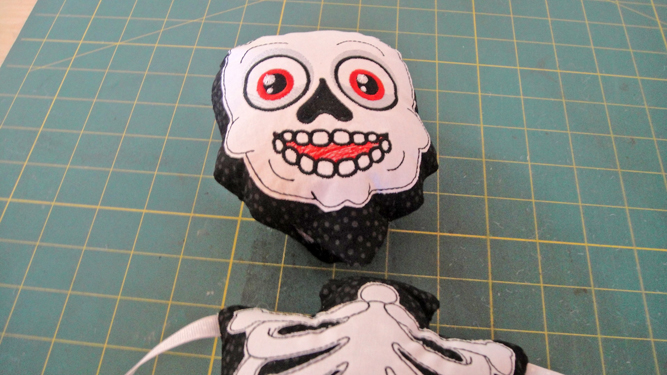
Trim around the head with a ¼” seam allowance, leaving a ½” seam allowance at the opening. Clip the curves, turn right side out and stuff firmly.
(Click Image to Enlarge)
Step 15:
I found it easier to attach the head to the body if you turn in the seam allowance on the head and baste it with long contrasting stitches. Then insert the neck into the head and pin in place.
(Click Image to Enlarge)
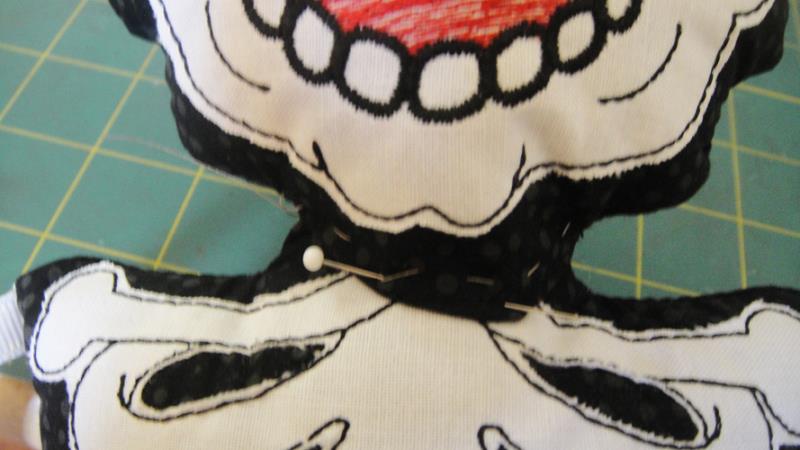
Step 16:
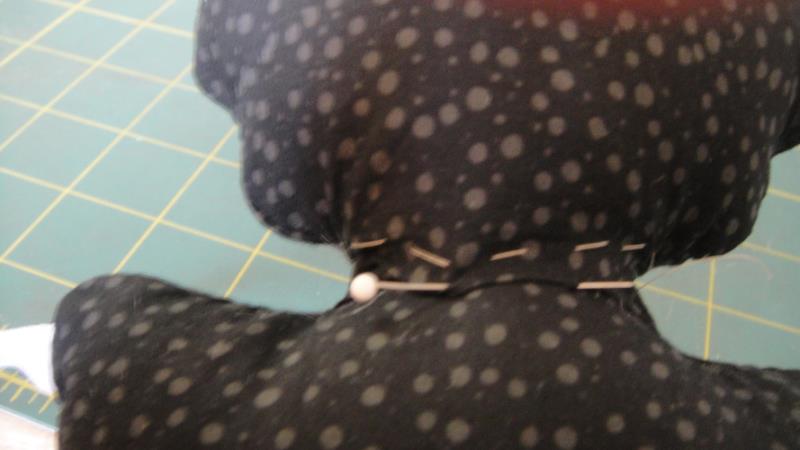
Make sure the neck is firmly inserted into the head. A longer needle, such as a 2.5” doll needle simplifies sewing the head on with a ladder stitch. Using a thread wax to condition your thread also makes any hand sewing easier by preventing knows and twists in your thread. There are many youtube videos on how to do a ladder stitch if you need them. Stitch the head to the body and remove your basting stitches.
(Click Image to Enlarge)
Step 17:
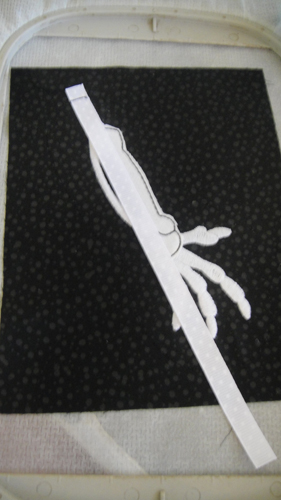
The rest of the design files can be made in a 5” x 7” hoop. Design files SKEL03B and SKEL04B will make the right and left arms respectively. Follow the Steps 3 through 12 to stitch the pieces. There are only two ribbons attached to these bones – one at each end. It is recommended that you attach each section of the limbs to the skeleton as they are completed. The first arm bone goes on the skeleton’s right side (that is your left side when looking at the skeleton). The small end of the bone goes toward his shoulder. Files SKEL07B and SKEL08B make the thighs following these same steps. The smaller end of the bone goes to the top of the hip joint for the thigh bones.
(Click Image to Enlarge)
Step 18:
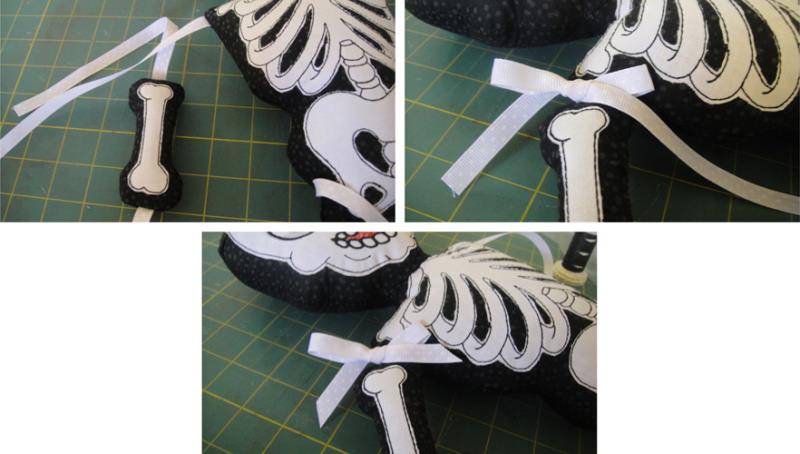
Tie the two ends of the ribbon together in a knot close to the joint before tying the bow. Tie the bow and then trim the ends to the length that you would like.
(Click Image to Enlarge)
Step 19:
(Click Image to Enlarge)
Design files SKEL05B and SKEL06B make the skeleton’s lower arm and hand and files SKEL09B and SKEL010B make the lower leg and foot. Follow the techniques above to make these parts. The only difference in these files is that the finger and foot bones will stitch in white before the appliqued bones are stitched. There is only one ribbon attached at the top of each of these pieces.
Step 20:
(Click Image to Enlarge)
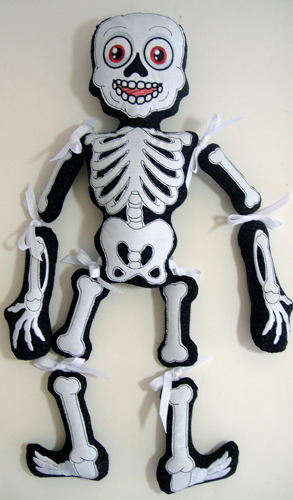
When you have attached all of the bones your skeleton should look like this. Be sure the thumb bones are on the upper part of the hands.
Step 21:
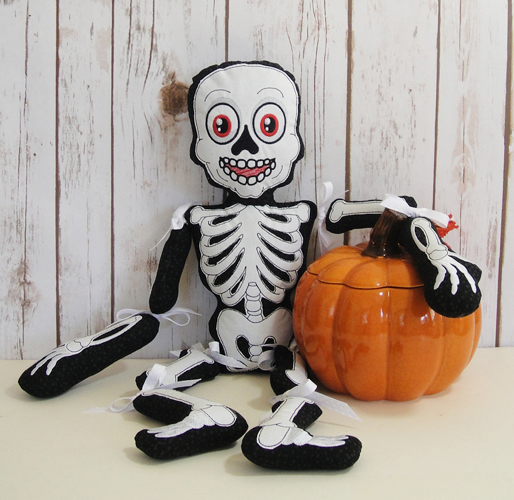
Proudly display your Bow Jointed Skeletons all over your house. A few autumn props and something to lean against is all he needs.
Award winning Digitizer, Embroidery Educator, Author and a Consultant to the Industry, Pat Williams has 30 years of experience in the embroidery industry. Pat has won multiple awards for her digitizing expertise including the 2007 Impressions Awards Grand Championship, Best of Show as well as the 1st and 2nd Place Awards. Pat’s love of digitizing has afforded her the opportunity to write numerous articles for Impressions magazine in the United States and Images Magazine in Europe. In 2001 Pat was named “Embroidery Educator of the Year.” For many years Pat taught digitizing seminars at the ISS Shows in Long Beach, CA and for Compucon software. She now resides in Tucson, AZ.