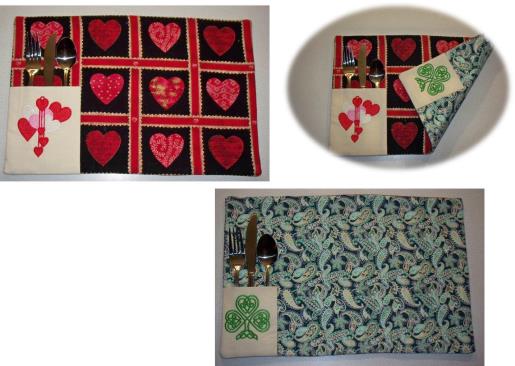
This project will show the general steps for making a reversible placemat. Any designs with any holiday or seasonal themed fabric may be used. Make them reversible by using two holidays or a holiday and season that are in close proximity on the calendar such as July 4th and summer, Easter and spring, or such as what was done for the project, Valentine’s Day and St. Patrick’s Day.
Standard placemat designs are 12” x 18” and 14” x 20”. Start with fabric larger than needed and then cut down to size. Use ½” seam allowances for the outside edge of the placemat and left side of the pocket, and ¼” seam allowance for the right side of the pocket.
Use these instructions to determine the size of pocket and placemat size you would like for your finished project and adjust the measurements accordingly.
Step 1:
Gather the materials and read through the instructions before beginning. Print out a paper template of the design and color sequence. Use the information in the Preface for standard placemat sizes and seam allowance information. Cut fabrics larger than needed and then cut them down to size. Cut the flannel larger than needed for quilting each placemat side.
(Click Image to Enlarge)
Step 2:
Square up and cut the two themed fabrics larger than needed. Use the printed template to create the pocket. The flatware service was used to generally decide on a pocket size (which also depends upon the embroidery design size). Use a pencil and sketch the top fold line of the fabric and the bottom, left and right sides of the design on the paper template. To this, add ½” seam allowances for the bottom and left side, and ¼” seam allowance on the right. Double the length (pocket is folded in half). Fuse the interfacing to the back side of the linen. Draw the pocket shape on the linen and mark the center position of the design. For this pocket, the pocket was marked 4.5” wide and 10” long. The center point of the design was marked 3” up from the bottom and 2” in from the right side. Be sure to adjust measurements for your project.
(Click Image to Enlarge)
Step 3:
Hoop the fabric with a layer of tearaway stabilizer. Load the “Shamrock Knot” embroidery design on the machine and align the needle to the center of the paper template. Stitch the design. Remove the fabric from the hoop and remove the excess stabilizer; press the fabric.
(Click Image to Enlarge)
Step 4:
Cut the embroidered fabric along the pencil line. Fold the fabric in half wrong sides together to form the pocket. Position the pocket on the lower left side of the themed fabric, aligning the bottom edge but having the left edge ¼” off the themed fabric (seam allowance amount for stitching pocket). Now flip the pocket to the right and pin in place.
(Click Image to Enlarge)
Step 5:
Stitch the pocket in place using the ¼” seam allowance. Flip the pocket to the left and press the seam. Pin and baste the bottom and left edges of the pocket to the themed fabric.
(Click Image to Enlarge)
Step 6:
Now repeat the steps of measuring and stitching the pocket fabric for the other themed pocket design which for this project was “Heart Décor”. This was actually a free-standing lace design but the stitch count was such it was able to be stitched directly on the linen fabric.
(Click Image to Enlarge)
Step 7:
Cut out the pocket and sew the pocket to the lower left of the second themed fabric (Valentine fabric). Now the two placemats are ready for quilting.
(Click Image to Enlarge)
Step 8:
For this project two pieces of heavy weight cotton flannel are used instead of batting to help reduce bulk and to allow two different quilting patterns to be used. Trim the themed fabric with pockets to the finished size, plus seam allowances then pin each to a piece of the flannel and quilt as desired. Do as much or as little quilting as you’d like.
(Click Image to Enlarge)
Step 9:
Now lay the placemats with the pockets positioned in opposite corners as shown. Place one over the other, right sides together and pin them together. Sew the placemats together using ½” seam allowances, leaving an opening at the bottom for turning. Turn the placemat right side out forming the seams and corners well.
(Click Image to Enlarge)
Step 10:
Press the placemat along the seams and hand stitch the opening closed.
(Click Image to Enlarge)
Step 11:
Congratulations on creating a “Reversible Holiday Placemat”. Make several for all the seasons of the year.
Ramona Baird has been in the embroidery industry for over 23 years. She and her husband owned a commercial and retail embroidery store in Arizona for many years. She is an experienced digitizer having been mentored by award-winners Pat Williams and Lindee Goodall. Ramona is a contributor to “Creative Machine Embroidery” magazine having 5 covers to her credit. Ramona has worked for Wilcom America and served many years as Education Director for the American Sewing Guild. With a degree in fashion design, she is able to design and execute patterns which Pat Williams says are “out of the box” in creativity and application. Ramona likes to challenge the boundaries of embroidery and bring new and exciting designs, ideas, and projects to EmbroideryDesigns.com. She wants embroiderers of all levels to increase their skills and enjoyment in using their embroidery machine for gift-making and personal pleasure.