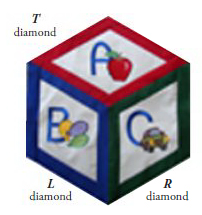
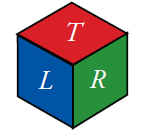
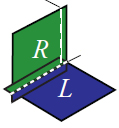
Step 1: | 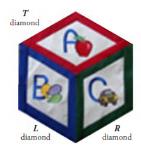 (Click Image to Enlarge) Fussy-cut (center) an embroidered design, inside the Top, Left and Right diamonds. The diamonds are sewn into tumbling blocks, which are joined together into a fun quilt. Tumbling blocks are made from three diamonds - a Top, a Left and a Right. Each of these embroidered designs is fussy-cut following the directional lines on the View & Do™ Diamond Shape. Fussy-Cut Key: T - Top Diamond L - Left Diamond R - Right Diamond |
Step 2: | 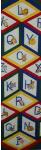 (Click Image to Enlarge) Plan Your Quilt
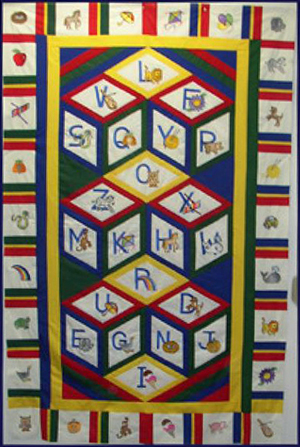
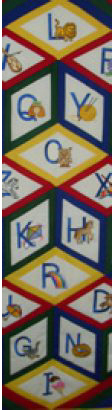
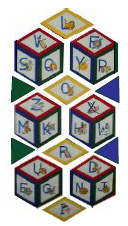
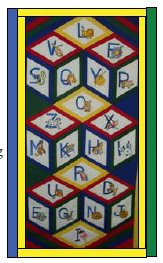
Embroider the alphabet blocks. 22 of the alphabet designs are used in this quilt. The embroidery disk includes both the letters and the designs. The borders are pieced with the designs from the embroidery card. Before cutting the diamonds from the embroidery designs, plan your quilt. Place the designs randomly, in alphabetical order, or spell out a name across or down the quilt. The cover quilt spells out LORI down the center of the quilt inside the Top diamonds bordered with yellow strips.
The following diamonds are needed: 10 Top diamonds, 4 bordered with yellow strips, 6 bordered with red strips, 6 Left diamonds bordered with blue strips, 6 Right diamonds bordered with green strips. |
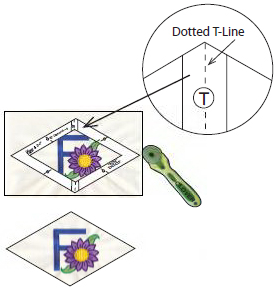
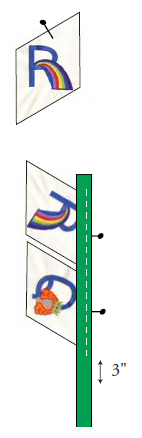
Step 3: | 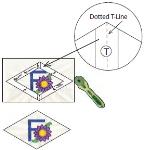 (Click Image to Enlarge) Fussy-Cut T Diamonds
Center the embroidery design inside the opening of the 8" Diamond Shape. The design of the fabric design should line up vertically (up and down) with the dotted T-Line on the Diamond Shape. Cut 10 T diamonds from the embroidered designs by rotary cutting around the outside of the 8" Diamond Shape. |
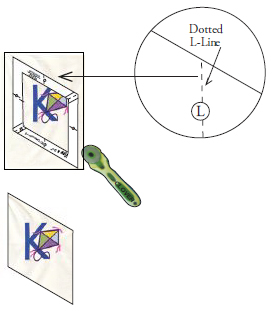
Step 4: | 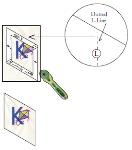 (Click Image to Enlarge) Fussy-Cut L Diamonds
Center the fabric design inside the opening of the 8" Diamond Shape. The top and bottom of the fabric design should line up vertically with the dotted L-line on the Diamond Shape. Cut 6 L diamonds from the embroidered designs by rotary cutting around the outside of the 8" Diamond Shape. |
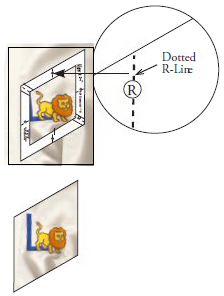
Step 5: | 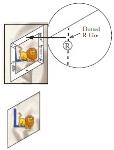 (Click Image to Enlarge) Fussy-Cut R Diamonds
Center the design inside the opening of the 8" Diamond Shape. The top and bottom of the fabric design should line up vertically with the dotted R-line on the Diamond Shape. Cut 6 R diamonds from the embroidered designs by rotary cutting around the outside of the 8" Diamond Shape. |
Step 6: | 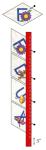 (Click Image to Enlarge) Add Borders To The T Diamonds
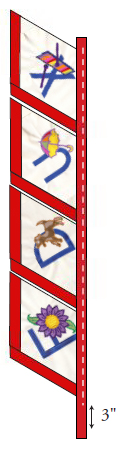
There are 10 Top diamonds: 6 bordered with red strips, 4 bordered with yellow strips. Cut 1½" x 42" strips from the border fabrics: Red 6 strips, Yellow 4 strips. Pin mark the top right side of each diamond. Put a pin on this side, which will be the first side to be sewn. With the strip on top, chain sew a red strip to the pinned side of 6 of the T diamonds. These 6 are called the red T diamonds.
Chain sew a yellow strip to the pinned side of the other 4 T diamonds. These 4 are called the yellow T diamonds. The strip is cut on the straight of grain; Sewing with the strip on top will help to keep the off-grain sides of the diamond from stretching. Start sewing the diamonds at the top of the strip, but stop sewing at least 3" from the bottom of the strip. The diamonds should be touching, but not overlapping. Press the seam allowances toward the strip and away from the diamonds. |
Step 7: | Line up the Diamond
Shape even with the top of the strip and the side of the diamond. Cut the strip along the angle of the Diamond Shape. Move the Diamond Shape so it lines up with the other side of the diamond and even with the top of the strip. Cut along the angle. Continue cutting the strip between each diamond, by lining up the View & Do Diamond Shape with the strip and the side of the diamond. | 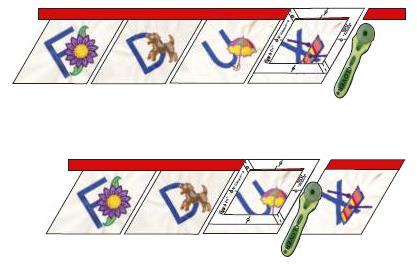 |
Step 8: | 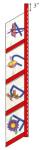 (Click Image to Enlarge) Chain sew one of the red strips to the top left of the 6 red T diamonds. Chain sew one of the yellow strips to the top left of the 4 yellow T diamonds. Start sewing the diamonds 3" down from the top of the strip. The diamonds should be touching, but not overlapping. Press the seam allowances toward the strip and away from the diamond. |
Step 9: | Cut the strip by lining up the View & Do Diamond Shape with the new strip and the side of the diamond. |  |
Step 10: | Move the Diamond Shape so it lines up with the other side of the diamond and even with the top of the strip. Cut along the angle. | 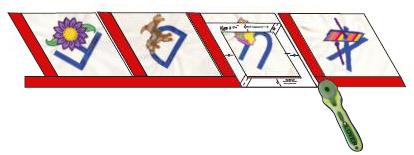 |
Step 11: | 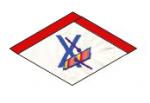 (Click Image to Enlarge) Continue cutting the strip between each diamond, by lining up the View & Do Diamond Shape with the strip and the side of the diamond. |
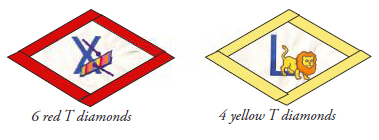
Step 12: |  (Click Image to Enlarge) Sew a strip to the left bottom of the red and yellow T diamonds. Start sewing the diamonds at the top of the strip, but stop sewing 3" from the bottom of the strip. Press the seam allowances away from the diamond and toward the strip. Cut the strip between the diamonds by lining up the View & Do Diamond Shape with the new strip and the side of the diamond. |
Step 13: |  (Click Image to Enlarge) Sew a strip to the right bottom of the red and yellow T diamonds. Start sewing the diamonds 3" down from the top of the strip. The diamonds should be touching, but not overlapping. Press the seam allowances away from the diamond and toward the strip. Cut the strip between the diamonds by lining up the View & Do Diamond Shape with the new strip and the side of the diamond. |
Step 14: | 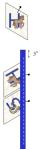 (Click Image to Enlarge) Add Borders To The L Diamonds
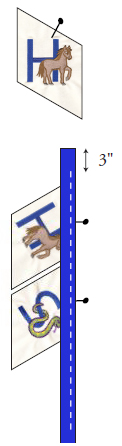
Cut 6 1½" x 42" strips from the blue fabric. Pin mark the top of the 6 L diamonds. With the blue strip on top, chain sew one of these strips to the pinned side of each of the 6 L diamonds. Start sewing the diamonds 3" down from the top of the strip. The diamonds should be touching, but not overlapping. Press the seam allowances toward the strip and away from the diamonds. |
Step 15: | 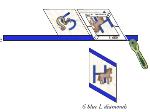 (Click Image to Enlarge) Cut the strip between the diamonds by lining up the View & Do Diamond Shape with the new strip and the side of the diamond. Sew a blue strip to the bottom of each of the L diamonds. Start sewing at the top of the strip, but stop sewing 3" from the bottom. Press the seam allowances toward the strips. Cut the strip using the Diamond Shape lined up with the top of the strip and the side of the diamond. |
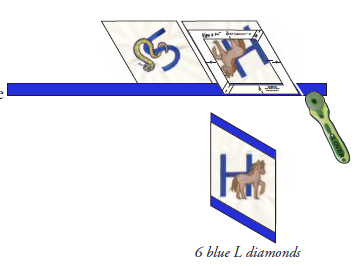
Step 16: |  (Click Image to Enlarge) Chain sew a strip to the left and right side of each of the L diamonds. Press the seam allowances toward the strip and away from the diamond. Cut the strip between each diamond using the Diamond View & Do Shape, as shown above. |
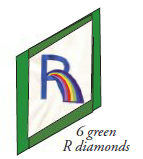
Step 17: | 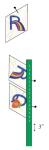 (Click Image to Enlarge) Add Borders To The R Diamonds
Cut 6 1½" strips from the green fabric. Pin mark the top of each R diamond. With the green strip on top, chain sew one of these strips to the pinned side of each of the 6 R diamonds. Start sewing at the top of the strip, but stop sewing 3" from the bottom. Press the seam allowances toward the green strip. Cut the strip between each diamond using the Diamond View & Do Shape, as shown above. Sew a green strip to the bottom of each of the L diamonds. Start sewing at 3" down from the top of the strip. Press the seam allowances toward the green strips. Cut the strip using the Diamond Shape lined up with the top of the strip and the side of the diamond. |
Step 18: |  (Click Image to Enlarge) Chain sew a strip to each side of the R diamonds. Press the seam allowances toward the strip and away from the diamond. Cut the strip between each diamond using the Diamond View & Do Shape, as shown on step 9. |
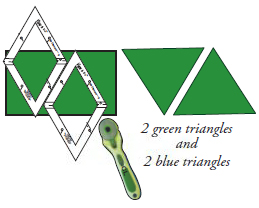
Step 19: |  (Click Image to Enlarge) Solid Triangles
Cut a piece of blue and a piece of green fabric 8½" x 14". Place the sharp angle of the View & Do™ Diamond Shape at the top of the piece of fabric. Cut each of these pieces into a triangle along the Diamond Shape from the point down to the bottom of the strip. Turn the Diamond Shape upside down with the point at the bottom of the fabric to cut the second triangle. |
Step 20: | Tumbling Blocks
Sew each L diamond to an R diamond. Sew all the way from the top to the bottom. Press the seam allowances between the two diamonds open. |
Step 21: | Line up a T diamond underneath the R diamond, right sides together. All four edges of the T diamond (underneath) should line up with the R diamond. Press seam allowances open. |
Step 22: | |
Put a pin into the seam allowance between the L and R diamonds. The pin should go through to the T diamond exactly ¼" from the edge. Start stitching at the end of diamonds. Sew the T and R diamonds from the top to the seamline. Stop with the needle down in the center of the seamline. |
Step 23: | With the needle still down in the middle of the seamline, bring the T diamond even with the L diamond. The R diamond will be folded in half. Sew from the seamline down to the bottom of the L and T diamonds. Press the seam allowances away from the T diamond. Sew 6 tumbling blocks using this Y-seam technique. |
Step 24: | 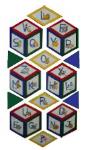 (Click Image to Enlarge) Sew The Quilt Top Together
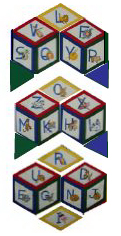
Sew 6 tumbling blocks together. Lay out all the pieces. The quilt is made up of 6 complete tumbling blocks, and 4 yellow T diamonds, 2 blue triangles, and 2 green triangles. Sew the pieces into units, as shown. Sew the units together using the Y-seam directions. |
Step 25: | 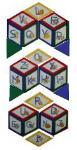 (Click Image to Enlarge) Corners Of The Quilt
Sew 2" red, green & blue strips to the top and bottom corners. After sewing, square off the ends of the strips using a ruler. Finish with a 3½" wide red or blue strip. The order of the strips can be identical in each corner, or make each corner different. |
Step 28: | 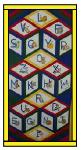 (Click Image to Enlarge) First Border
Cut 6 2½" wide strips of yellow. Sew 2 strips together lengthwise for each side border. Cut these strips the length of the quilt. Pin the border strips to the quilt top, matching both ends and the center seamline between the 2 strips with the center of the quilt. Press the seam allowances toward the border strips. Cut the 2 remaining yellow strips the width of the quilt, including the side borders. Pin the border strip to the top and bottom of the quilt, matching the ends and centers of each strip. Sew the strips to the top and bottom of the quilt. Press the seam allowances toward the border strip. |
Step 29: | 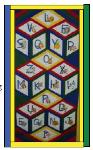 (Click Image to Enlarge) Second Border
Cut 2 2½" green strips for the right side of the quilt. Cut 2 2½" blue strips for the left side of the quilt. Sew the 2 strips together to make long border strips. Pin the green strip to the right side of the quilt, matching the ends and center of the strip. Pin the blue strip to the left side of the quilt, matching the ends and center. Sew the strip to the quilt. Press the seam allowances toward the border strip. |
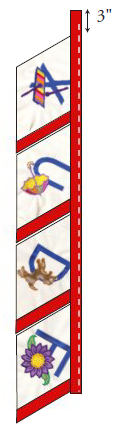
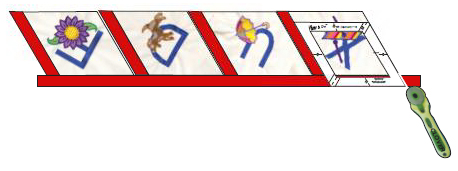
Step 30: | Fussy Cut Borders
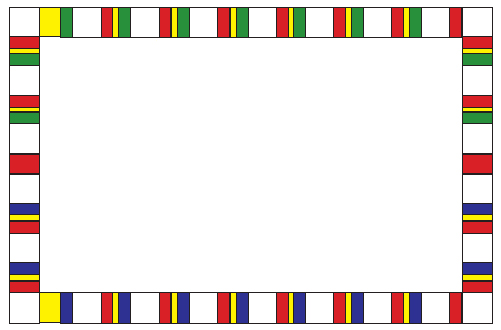
26 embroidery designs, without the alphabet letters, are used in the border. Cut these embroideries into 26 6" fussy-cut squares.
Cut 22 2" x 6" red pieces. Cut 11 2" x 6" blue pieces. Cut 11 2" x 6" green pieces. Cut 20 1" x 6" yellow pieces.
Sew the side border strips, following the design shown. Adjust the length of the strip by adding a solid piece of yellow fabric at the bottom of each border. Sew the top and bottom border strips, following the design shown. Adjust the length of the strip by adding a solid piece of red fabric in the center of each border. Press the seam allowance away from the pieced borders. | 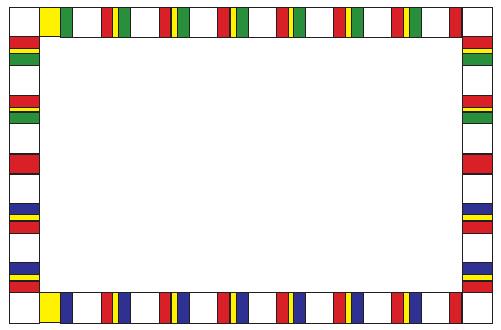 |
Step 31: | Finish the quilt
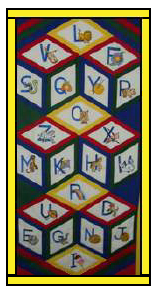
Layer the quilt top, batting and backing. Hand or machine quilt. Bind the quilt. Y-seam technique is included: A two-step technique for perfect Y-seams (anchored seams and pivoting) makes it much easier to have a perfect inside point. |
|