10” x 22” Fabric (micro-fleece, chenille, polyester felt)
10” x 22” soft cut-away stabilizer
Peel ‘N’ Stick stabilizer (to fit smallest hoop)
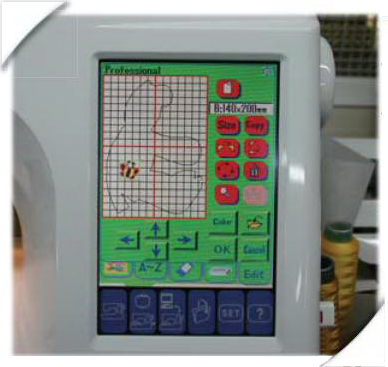
Embroidery hoop minimum size 5.5” x 8” - (140 mm x 200 mm)
Extra embroidery hoop 2” x 2” - (50 mm x 50 mm) ** optional but very helpful
Embroidery foot & 1/4” seam foot
Embroidery thread
Thread and bobbin to match fabric
Pins, ruler
Polyester fiberfill
Note: The Fabric and Stabilizer can be one piece (size as above) that is re-hooped 4 times, or it can be 4 pieces, each large enough to completely fit in the hoop.
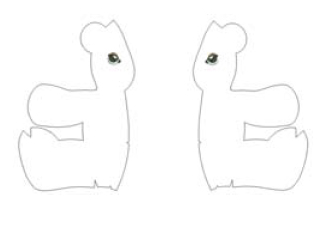
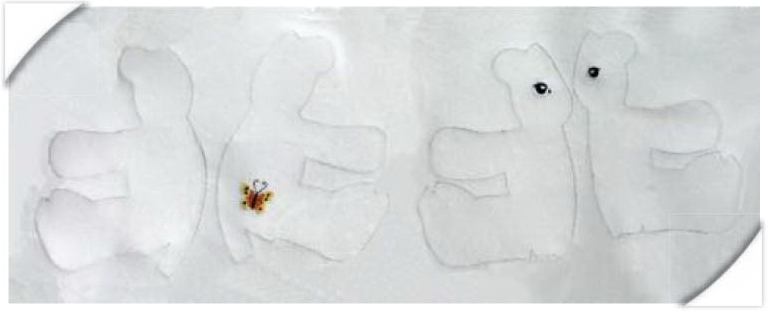
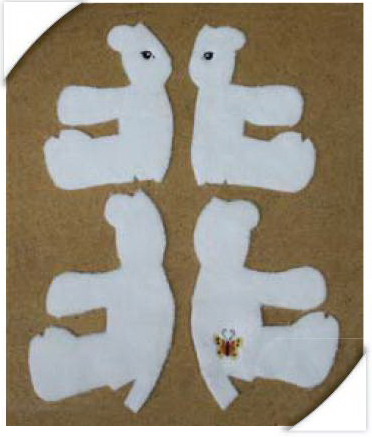
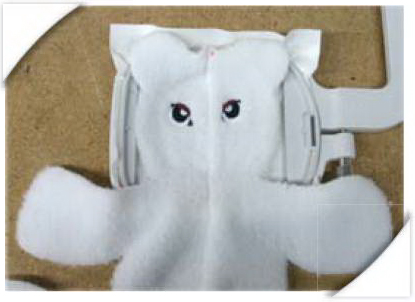
Each stuffed toy requires that you embroider 4 Body pattern pieces/panels to be sewn together to complete the animal - (front left and right, back left and right). The Body patterns sew right on your machine, one at a time. Extras, such as numbers, letters, and graphics can be added to each pattern to create a unique toy. The pattern pieces are then cut out and sewn together to complete the toy.
Step 1:
(Click Image to Enlarge)
Included in the set:
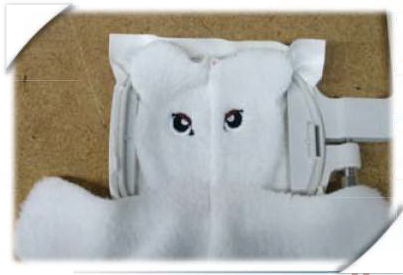
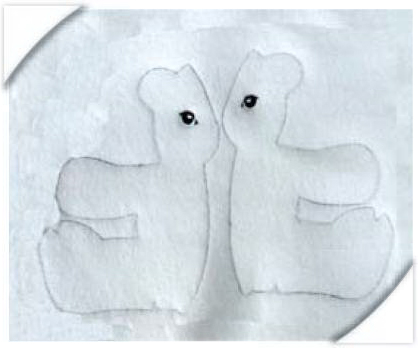
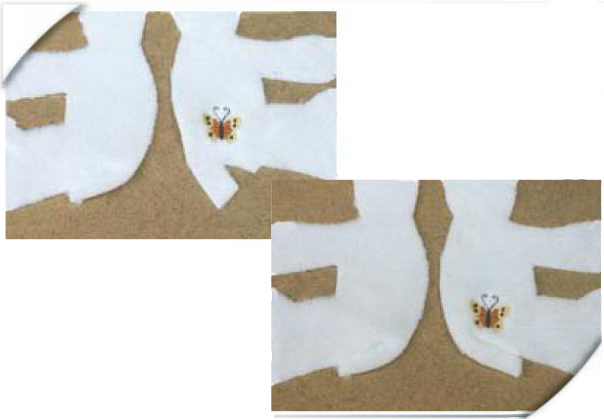
Front left and right Body patterns - with eyes.
Step 2:
(Click Image to Enlarge)
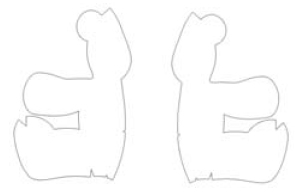
Front left and right Body patterns - blank (hand stitch your own eyes, add pre-made from craft store, or add closed eyes from “extras”).
Step 3:
(Click Image to Enlarge)
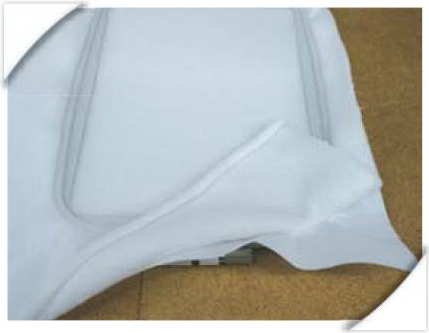
Back left and right Body patterns - blank.
Step 4:
Set of “Extras” to make each toy uniquely personalized!
(Click Image to Enlarge)
Step 5:
Getting Started
Choose the front designs that you would like to sew (with eyes or blank). Choose the extras that you would like to add to the toy. Each toy can be themed to an occasion or an individual, or made unique in it’s own little way! Choose the method for adding the extras that best suits your machine and software.
Step 6:
Adding Extras: there are 3 ways to add an “extra” to a pattern piece.
Step 7:
Editing Software
Use your editing software (such as EasyEdit, Editor, PED Basic) to combine Body pattern(s) with selected “extras”. This method will work if you want to add an “extra” to one side of the toy (ie: a button on the bum). There are many different brands and versions of editing software on the market today. Please see your software manual for instructions.
Step 8:
(Click Image to Enlarge)
On the Embroidery Machine
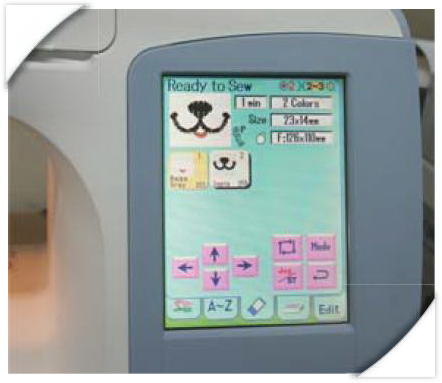
a) Use the “Edit Mode” on your embroidery machine to combine Body pattern(s) with selected “extras”. b) Sew the Body pattern piece and any selected extras in the same hooping. Once the body pattern has sewn, prepare machine to sew the “extra” design and use the “jog” keys on your machine to start the design where you would like it placed.
TIP: You may need to use the “edit mode” to change the hoop size of the “extra” so that the machine will allow you to move freely in the large hoop. TIP: If you would like identical sides (button on either side of the bum in the same spot), sew one side and then mirror the design in edit mode to sew opposite side.
Step 9:
Embroidery on Center Front/Back of toy Once 2 Body pattern pieces have been embroidered, cut them out and sew them together (see page 3-4). Hoop Peel ‘N’ Stick stabilizer in your smallest embroidery hoop to sew “extras” (ie: nose, mouth, buttons down front) in the desired placement.
Step 10:
Embroidery
Prepare designs for left/right FRONT (with or without eyes) for embroidery. If editing software is available, add any desired “extras” to the design(s). Transfer designs to your embroidery machine using your usual method (ATA PC card, direct transfer...) If editing software is not available, transfer any desired “extras” to the machine at this time. They will be added on the machine.
Step 11:
Hoop cut-away stabilizer and fabric together in the hoop and prepare machine for embroidery.
Step 12:
Sew embroidery design. If “extras” have been added using software, follow all of the color stops in each of the designs. If designs are to be added on the machine, follow Step (a or b) On the Embroidery Machine of “Adding Extras” to complete EACH of the FRONT Body patterns.
Step 13:
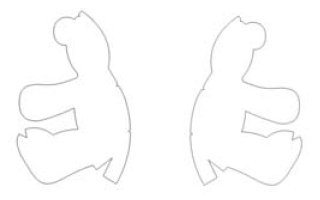
Repeat 3 steps from Adding Extras to complete the embroidery for the left/right BACK designs.
(Click Image to Enlarge)
Step 14:
(Click Image to Enlarge)
Carefully cut exactly on the run-stitch cutline of all 4 Embroidered Body pattern pieces. Once the perimeter has been cut, be sure to cut all notches. Remove stabilizer and any loose threads.
Step 15:
Construction
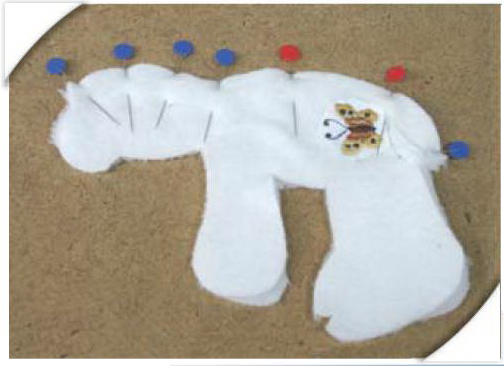
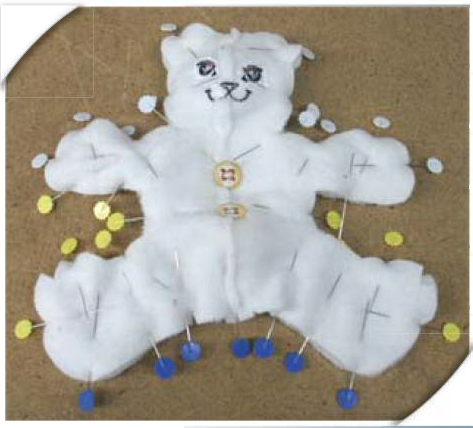
Pin 2 FRONT pieces, right sides together, along the “center” edge. Be sure to line up all notches exactly.
Step 16:
Change machine to regular sewing. Thread machine and insert bobbin of matching thread to fabric. Sew 1/4” (SA) along center pinned area only. (our sample is sewn in contrasting thread for visibility).
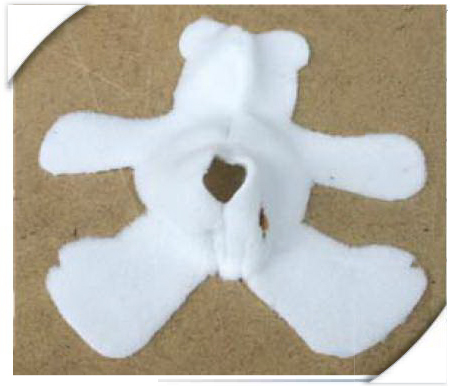
Step 17:
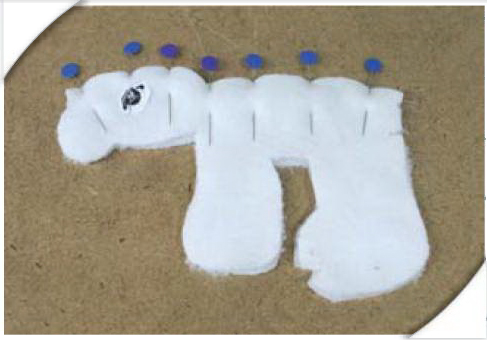
On each BACK pattern piece, fold right sides together at bottom notch and sew 1/4” (SA) along each notch. This forms the bottom of the toy so that it sits correctly.
(Click Image to Enlarge)
Step 18:
Pin 2 BACK pieces, right sides together, along the center edge. Be sure to line up all notches exactly. Notice the 2 notches (red pins) along the center seam area. Do not sew in between these notches. This opening will be used to stuff the toy and attach the tail.
Step 19:
Sew 1/4” (SA) along center pinned area to the 1st notch. Backstitch at this spot. Move needle to 2nd notch position. Backstitch here and continue sewing to edge.
Step 20:
Additional Embroidery
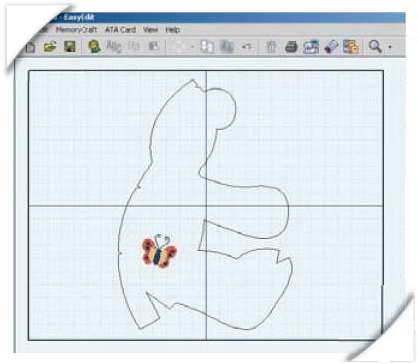
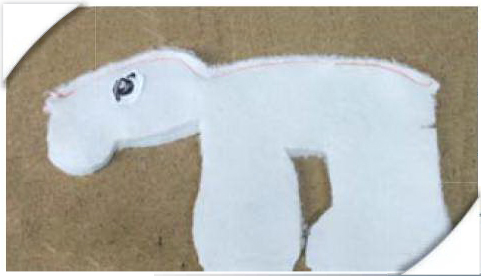
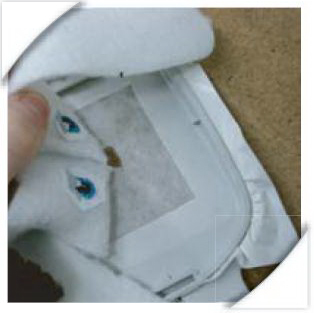
Now the front and back panels are ready for any additional embroidery, such as the nose/mouth, or “extras” through the center of the body. It is important to hoop the front/back panels securely in order to embroidery any additional designs through the center of the toy. Use your smallest available hoop to ensure the best results.
Step 21:
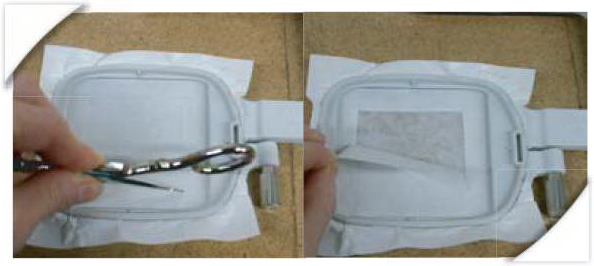
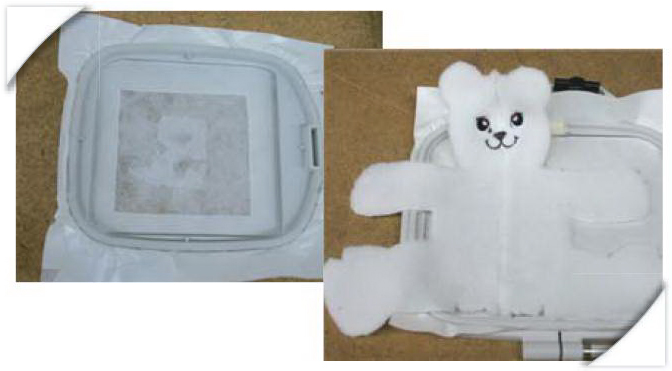
Hoop Peel ‘N’ Stick with peel away backing side up. Score a square inside the hoop area with scissors or a pin. Peel square back to reveal the sticky surface.
(Click Image to Enlarge)
Step 22:
Place Front/Back panel on sticky surface with desired embroidery placement as close to hoop center as possible. Be sure that the panel is straight.
Step 23:
Prepare machine to sew desired design. Use the “jog” keys on the machine to move the needle to the desired position. Be sure to do a “perimeter trace” to make sure the design will sew in the desired location.
Step 24:
(Click Image to Enlarge)
Sew design. When complete, remove hoop from machine and gently pull the fabric from the sticky surface. Remove any stabilizer that is left on the back of the embroidery.
Step 25:
To sew any additional designs, repair hole in sticky surface with scraps or small portions from the edges of the stabilizer. Repeat steps 22-24.
(Click Image to Enlarge)
Step 26:
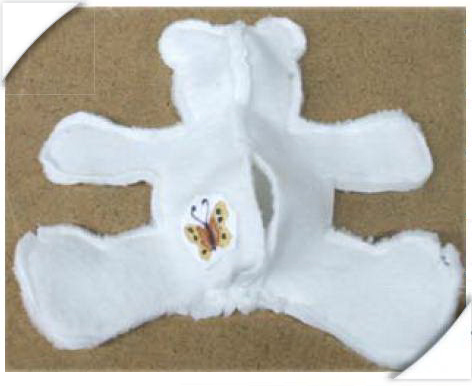
Back to Construction
Now that all of the embroidery is complete, the toy can be sewn together. Change your machine back to regular stitching mode. Thread the machine with top and bobbin thread to match the fabric.
Step 27:
Pin back and front panels, right sides together. Be sure that all edges and notches are lined up. Small pins are handy here.
Step 28:
Sew 1/4” (SA) around entire edge. Be sure to backtack at start and end to secure the stitches.
Step 29:
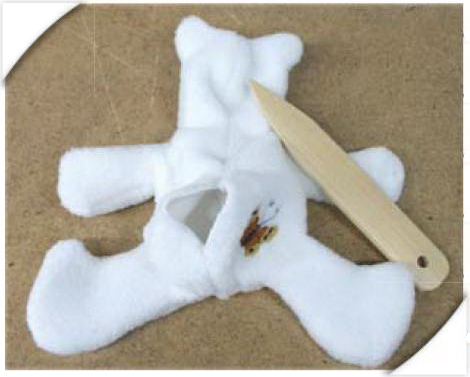
Turn toy right side out through opening at back. Because the toy is small, you must be very careful and patient! A point turner is useful here to help “poke out” the edges.
Step 30:
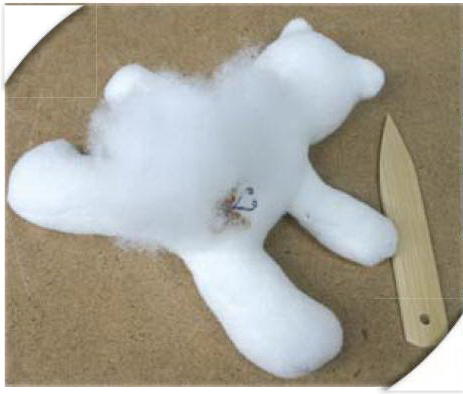
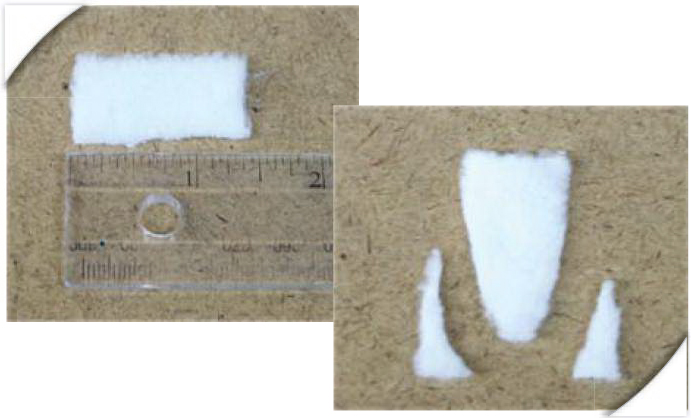
Carefully stuff with fiberfill through the opening at back. Use a point turner to fill the legs, arms, etc.
Step 31:
Cut a 1” x 1.5” piece of fabric. Snip 2 long corners to form the tail shape. Thread a needle with matching thread to fabric.
(Click Image to Enlarge)
Step 32:
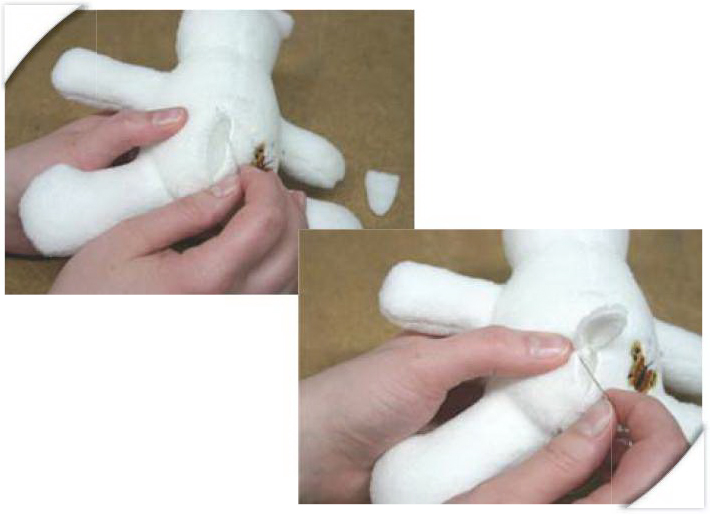
Slip stitch the opening at the back of the animal about half way. Insert the tail and stitch around it to secure it to the body. Continue to slip stitch the opening to the bottom to completely close.
(Click Image to Enlarge)
Step 33:
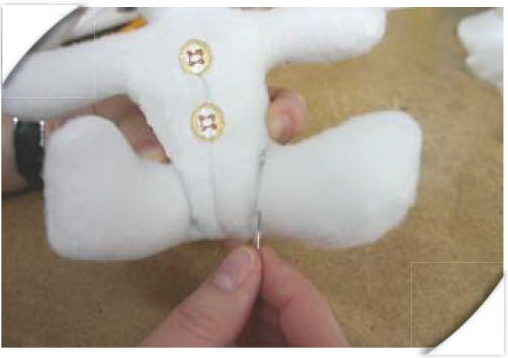
The legs of the animal can be secured in order to allow the animal to sit properly.
The name Stitchitize was coined and registered in 1988 when the Conquergoods sold their first contract embroidery business. “Stitchitize” was coined as the art of digitizing stitches for machine embroidery. The company actually started developing embroidery designs in 1983 and soon saw the need for Stock Embroidery Designs. By 1988 the company had several thousand Stock Designs to sell, however the majority of their development was still geared towards the commercial embroidery market. It wasn’t until 2001 when Trevor, the Conquergoods eldest son, now managing Stitchitize, saw the opportunity to start developing designs for the emerging domestic embroidery market. In 2002 the Conquergoods opened a Sewing Centre selling domestic machines and embroidery models. The staff members that were hired for the Sewing Centre were all accomplished sewers and they worked very closely with the Stitchitize staff developing new designs. It soon became apparent that project based designs would be well received by the consumers.
In late 2003 it was George Conquergood, the patriarch of the family that suggested the poem and storybook “Twas The Night Before Christmas” as a good place to start development. The manager of the Sewing Centre at that time, Brenda, was an accomplished artist and she was given the task to prepare the graphics for the storybook. Her drawings were then given to the digitizing department under direction of Beverley and her sister Linda the actual digitizer to execute. Another Sewing Centre staff member Darlene had the task of sewing the original prototypes, which eventually became an even bigger project. A quilt was also developed and Darlene and graphic artist Colin began the task of photographing and documenting every step of the construction process. Finally the collaborative efforts of eight staff members brought the project to completion and the production of the CD. To have the last word, George decided that as part of the product launch in 2004, Stitchitize would give every dealer a personalized copy of the storybook as a Christmas gift. The Conquergoods commercial production manager Darcy was brought in to discuss the logistics. Some of the pages in the book had over 24 colours and up to 42 color changes. Darcy was given the task to pleasingly reduce this to a maximum of 15 colours per page, as that was the maximum number of colours that their largest commercial machine could handle. He did this and started production of the over 200 books required. Darlene got to assemble all 200+ copies on a domestic sewing machine. The books were completed and sent out to all the dealers for Christmas 2004.
The following year George suggested the development of the Mother Goose 1 & 2 Collection, which was so well received that a second collection, Mother Goose 3 & 4 was produced. The graphics and nursery rhymes came from the original book “Mother Goose and her Goslings” which had belonged to George’s mother when she was a child, and read to George as a child. That book is now over 100 years old.
Other collaborative works included the FSL – 3D Flowers & Butterflies Collection, Italian Lace Collections, Mardi Gras Masks and the 13 Stitchitize Bees, which were fully tested by consumers in the Creative House Sewing Centre classrooms.