


PROJECT INSTRUCTIONS


PROJECT INSTRUCTIONS

Embroidery Tips for Leather Embroidery Project
By
Bonnie Landsberger
on
April 23, 2015
PROJECT DETAILS
Description
Leather presents many possibilities for embroidery and it doesn’t have to be as difficult as it may seem if you follow a few general rules.
Project Preview Video

Feather
$12.00
Circle Price: $10.80

QUICK VIEW
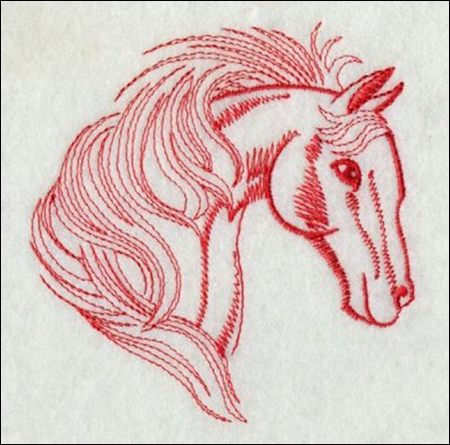
Redwork Horse
$6.00
Circle Price: $5.40

Large Soccer Ball
$4.39
Circle Price: $3.29

Bison Outline
$3.89
$1.95
Circle Price: $1.95

TIMBER WOLF
free
Circle Price: $0.00


Embroidery Tips for Leather |
 | Leather presents many possibilities for embroidery and it
doesn’t have to be as difficult as it may seem if you follow a few general
rules. There are pre-made items that are suitable for embroidery, such as
apparel including jackets, footwear, skullcaps, hats, vests and skirts, as well
as other items like wallets, briefcases and bags, home decor, vehicle seat
covers, pet collars, horse tack, tool belts, cell phone and gadget covers, book
covers and so much more! If you’re going to create your own item to embellish, you’ll want to start with the right type of leather. The three common types include oak-tanned leather, chrome-tanned leather and re-tanned leather. Heavy thick leathers are obviously not well-suited for sewing or embroidery and generally, leather weighing 6 ounces or less is best for stitching. Oak tanned leather comes in a lightweight version, chrome-tanned leather is soft and pliable, and re-tanned leather is suitable for items such as wallets. Various types of leather finishes and grains that are acceptable for embellishment include, garment cowhide, split cowhide suede, golden-colored deerskin, buck-tanned cowhide, pigskin, sheepskin and goatskin. You might also consider “pleather” (artificial leather) like Naugahyde that reacts to embroidery very much the same as genuine leather, and it is an excellent choice for testing designs before stitching on the final item. |
 | Finding the Right
Design The most common error made is the effort to embellish a leather item with a stock design that has been digitized in a general manner to accommodate most fabrics. Leather is not one of those fabrics! Experienced digitizers are aware of the necessary specs and are able to produce a custom design specifically for leather. But when you’re searching for a stock design, remember “less is more.” Styles that are best-suited for stitching on leather are those that consist of only satin stitch outlines and/or running stitches, such as seen in Redwork designs, however, some sections of fill will work in the right situations. Look for thin density styles that consist of line stitches or thin density fills with minimum coverage. Underlay stitches are not necessary with the exception of use as additional coverage. For example, a satin stitch column needs a bit less density to avoid slicing away the leather and cutting out the design like a stencil, and the lighter density can cause saw-tooth edges of the column; whereas, an underlay of a zigzag stitch less narrow than the top column can help fill in those sparse areas for a smoother appearance, and since it does not meet with the edge stitches of the top satin column there’s less chance of causing the leather to split. For the same reason, lengths of running and fill stitches should be fairly long to keep needle penetrations at a minimum. |
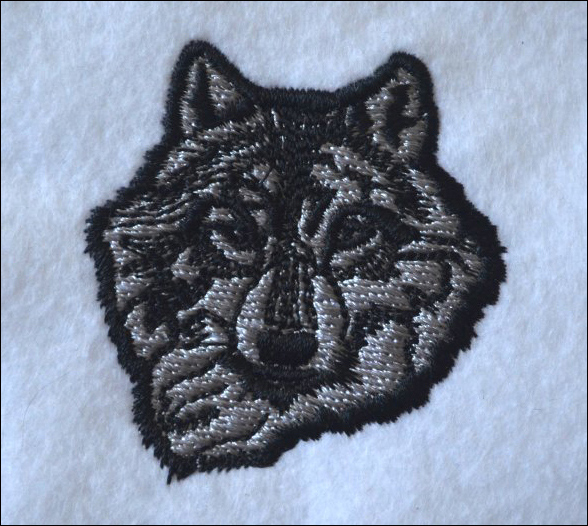 | Editing for Leather Before you begin editing a design, stitch it out on something like felt with a sheet of tear-away to test how it will react in a common situation. You will then get a good idea to judge just how much the design properties need to be edited. This test sample of the original Timber Wolf design by Global Puncher stitched on felt with one sheet of tear-away reveals a slight stress of the fabric around the outside of the stitches and it feels a bit heavy. The original design would actually work well if sewn on fabric that requires a dense coverage, such as terry cloth. This slight distortion when
stitched on felt indicates that it may result in excessive distortion if sewn
on leather, because leather is a stretchy substrate. Unlike woven or knitted fabrics that have
space for the yarns to move out of the way, the leather will push away from the
needle, and having nowhere to go, it results in the distortion of puckers or
buckling. The outline of the original design
is set with a density that leaves a nice clean edge on the felt, but when
stitching on leather, these closely set needle penetrations could cause the
design to cut away. |
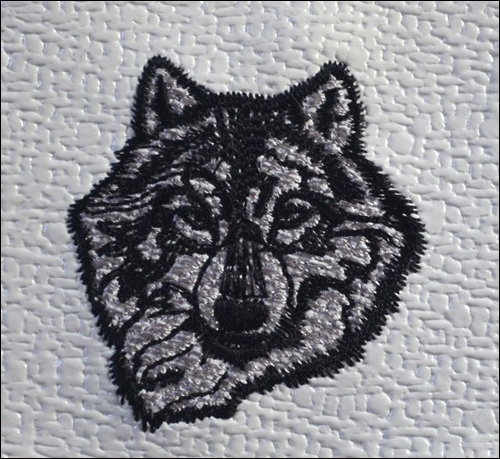 | Editing the design properties is usually only accurate when
using the digitizer’s software object file. However, one way to lighten
densities in a machine stitch file is to increase its size without globally
changing the stitch count. For better results, if you have design editing
software that allows adjusting the properties in a machine stitch file, you can
try lightening the density, as I did for the Timber Wolf design. I decreased
the density of the top layer of fill from .36 MM to .90 MM, and found that the
adjustment might have been a bit too much and more coverage might be sufficient
at a density of about .75 MM. However,
there still is a bit of a pucker occurring at the bottom of the design with
density set at .90 MM, and as long as this is stitched with silver thread on
white leather, the light density isn’t terribly obvious, so I’ve decided the
lighter coverage of the silver fill stitch to be the best option. I also
changed the density of the satin outline from .32 MM to .64 MM. (Note: to decrease density, the value number
must be adjusted higher and to increase density, the number is lowered).
|
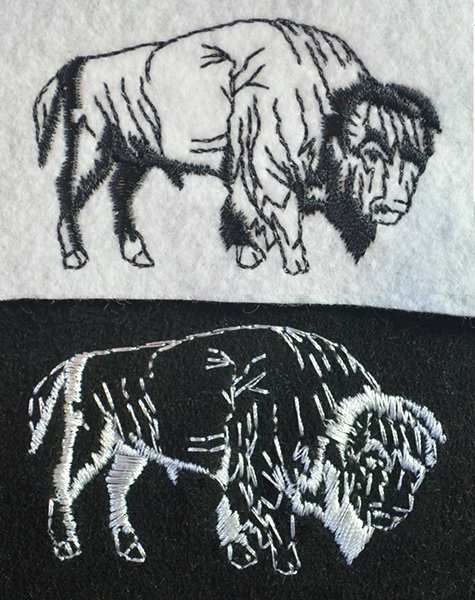 | Stitches that are unnecessary for embroidery on leather,
such as found in this Buffalo Outline design by Stitchitize, can be eliminated
in editing software by adjusting the stitch length longer and deleting various
elements that won’t drastically alter the design. I changed the stitch length
from 3.2 MM to 4.0 MM and I also deleted areas of underlay intended for a
foundation that just doesn’t make sense for leather. Although the stitch length
would have worked a bit shorter at about 3.5 MM, overall the modifications made
very little difference in appearance. The top sample is the original design on
felt and the bottom sample is my modified design sewn on black suede.
|
 | Whenever possible, choose a design with a sewing path that
starts at center and sews to the outside.
This is a general rule for any unstable or unique fabric, leather
included. The inside-out method causes
less stretch of the substrate, avoiding distortion like pushing, buckling and
puckering. Suede has, perhaps, the most
stretch, requiring as few stitches as possible, so choose a design such as this
Feather design by Dakota Collectibles that is created from line stitches and
thin density fill stitches. Keep in mind
that the suede is so stretchy that when the design is complete, its size will
result slightly larger on suede than it does on a more stable leather or fabric.
The amount of the size increase depends on the amount of stretch in the
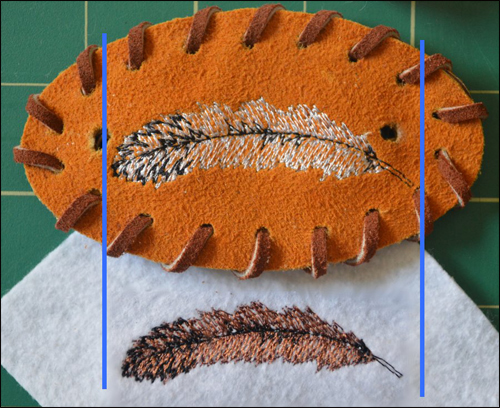
leather. As seen in this image with the help of the blue guidelines, this feather
design measures longer at 12.0 MM (about 1/4”) on the Suede Leather Hair Slide
project than when the same design is stitched on felt. This difference can be
significant, depending on the needs of your project. |
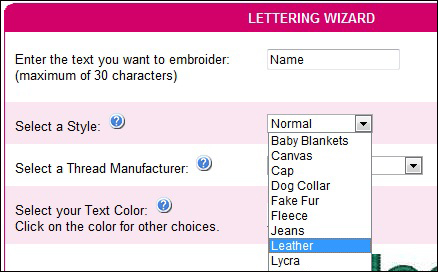 | Lettering on Leather Personalization is popular on leather, such as for a purse, wallet, Bible covers and similar items. Alphabet design fonts can be used if the particular style of font is not too detailed and its columns don’t taper to a sharp point with stitches so close together that they might cut away the leather. A simple block font or a script that doesn’t have sharp pointed column ends will work best, and the alphabet designs can be increased in size a little to lighten the density, if necessary. Keyboard lettering is best for personalization on lettering, because you are able to adjust the style parameters of density and stitch length, as well as omit or add underlay. If you do not have your own software program to set up keyboard lettering, the Instant Lettering online software program at EmbroideryDesigns.com offers a setting specifically for leather. Just choose “Leather” from the drop down for “Select a Style”. |
 | The Embroidery Rules Although backing isn’t needed to stabilize the leather, it shouldn’t be omitted, as it acts as a guard. A sheet of lightweight stabilizer will protect the machine by reducing the debris that can collect in the hook assembly, and it also insures smooth sewing, helping the leather glide as it sews. Tear-away works well, but embroiderers have reported using non-traditional backings of typing bond paper, brown paper grocery bags, and even wax paper, which some folks say works best for them, because it also lubricates the needle. If you embroider on stretchy suede it greatly improves the results; use a light spray of adhesive on a sheet of tear-away. The main purpose for backing on any type of leather is to catch fibers that may shred from the leather and fall into the bobbin area as the needle passes through, and it keeps the item afloat, moving smoothly as it sews. Tear-away stabilizer can also be used to enhance the quality of particular designs when it’s used as a topping. A design containing a lot of fill-sections, with a thick density and short stitches can destroy the leather surface, so a lighter density must be used and coverage might not always be what is desired. The solution is to lay a piece of stabilizer over the top prior to sewing. The color of the topping should be similar or the same as the thread to be sewn, such as a white tear-away under yellow thread coverage or black under navy blue thread. When the embroidery is complete, you must remove the excess backing so it’s best to use a thin, lightweight stabilizer that easily tears away. Hooping requires a bit of attention to avoid marks on various types of leather. Some leathers won’t mark at all, and others like some types of suede might result in a hoop mark, though many are generally forgiving, allowing quick removal of any marks with a soft bristle hand brush. To be safe and avoid hoop marks, there are precautionary methods you can try like wrapping the hoop rings with twill tape or athletic pre-wrap gauze, which may be most efficient when used in the production of a high-volume order. But if you are embroidering only one or a few items, the easiest method is to use a sheet of soft, lightweight tear-away or tissue paper, placed on top and hooped with the backing and garment; after it’s hooped, rip or cut away the center of the topping to make a window, exposing the leather surface where the embroidery will sew. When the garment is sandwiched between the backing and topping, there’s less chance for marks on the leather to occur. Needle type and size depends on the type of the leather being sewn. A standard 75/11 could easily break when penetrating thick leather due to a combination of heat produced by friction and the narrow size of the needle. However, there are some lightweight leathers that handle the process with a 75/11 needle quite well when the machine is not run at a high speed. (I use a 75/11 ball point needle for all designs stitched on leather seen in this article.) For thick leather, use a needle large enough to allow thread to travel easily through without resulting in frays or breaks, but it should not be so large that it leaves an unsightly hole with each stitch penetration; test with a 75/14. In general, soft leathers do best with a sharp-point needle, but a ball point should be used for thicker or harder leathers; if a sharp point needle is used on thick leather, by the time the needle has come back up, the leather may seal itself, hugging against the needle tip just enough to shred the thread. Needles, such as the wedge point, specifically designed for extremely thick, hard leathers are great for general sewing, but this type should not be used for embroidery, because the wedge point will also slice through any existing stitches where the embroidery might overlap. Thread types are another consideration. In general, a 40 WT thread is suitable for most leathers. Keep in mind that a 30 WT may be best in some situations, because it offers more coverage to a light density design, but it may also require a larger needle to help the thread through the leather without shredding. Oak-tanned products may deteriorate natural threads like cotton, so it’s best to use synthetic threads, such as polyester or acrylic. A spun polyester bobbin is reported to offer the best results. No matter the weight or type of thread used, slow down the machine speed to about 500-600 SPM (stitches per minute) or slower, in order to reduce friction that could melt and break threads. |
 | Test the Design The most significant thing you can do to be sure that your leather project is going to go well is to first test the design. This image of test samples of the design SC01-SP277 by Stitchitize, stitched by Roberta Erickson, owner of Personally Yours, Nevada, was embroidered on a Delong leather sleeve remnant, and then stitched to scrim felt using a 75/12 ball point needle and Madeira polyester thread. The final work was successfully produced on Delong 100% wool Letterman’s jackets with quilted lining. The most common reason folks give for not testing a design is that they feel leather is too expensive to use for experimenting, but always remember that a bad sample is less expensive than destroying the final work. There are options such as leather shops where you can purchase small scraps at a bargain price. Don’t overlook rummage sales or second hand stores where you can find large purses and old clothing made of leather. Worth mentioning again, look for pleather at your fabric shop, which is usually available at a much lower price than genuine leather. Keep a yard of pleather in your stash just for testing and when the time comes for that leather project, you’ll be glad you did! |
Projects You May Like
Meet the Author:
Bonnie Landsberger

Bonnie Landsberger has been a crafter and hand embroiderer since childhood and a machine embroiderer and digitizer since 1986. She was the in-house head digitizer for a 50-head embroidery shop for 11 years and later offered custom digitizing services and stock design sales through her web site for Moonlight Design since 1993. She currently also holds a position as a customer service representative at EmbroideryDesigns.com.
Bonnie has won several awards for digitizing, including a gold medal in the 2002 Digitizing Olympics and grand prize in all categories & first place for Winter Holidays category in the Stitches Magazine Great Greeting Card Contest 2003.
Her embroidery and digitizing technical articles can be found in various trade magazines and she is currently a contributing writer and Editorial Advisory Board Member for Stitches Magazine. You can also find more of her articles online at EmbroideryDesigns.com and will continue to contribute articles to our Learning Center.
Feedback
Characters Remaining
Please Login to Submit a Feedback
Invalid Characters, Please enter a valid Comment
Please enter a valid Comment
Reviewed On
Link is Broken, Please check the URL