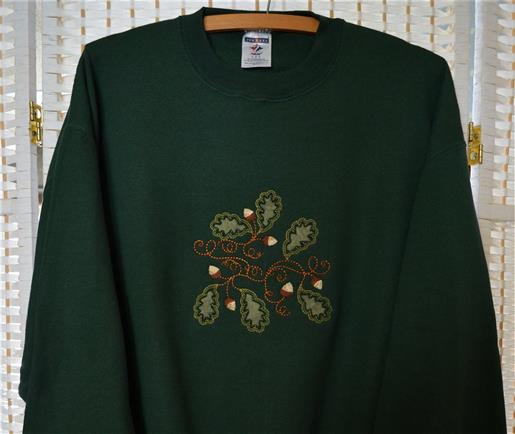
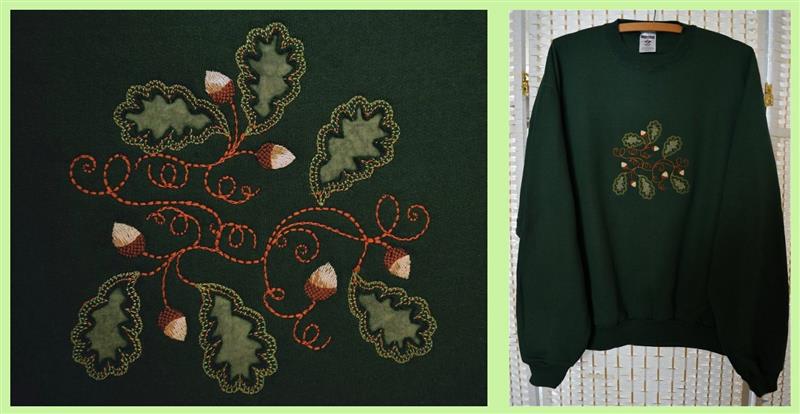
| Preface: | | This project offers general instructions for merging two designs, as well as duplicating elements to create your own original design by using an editing software program. I used Floriani Embroidery Suite; however, there are other editing programs that offer the same functions, sometimes referenced under different names. As well, there are some programs that do not offer the same functions, such as the ability to change property values or resequencing stitches or colors for the most logical sewing path. In that situation, the user must take into consideration that the design might result in unwanted color stops and multiple jump stitches, but the work can still be accomplished. If your editing program is limited or if preferred, this project can also be achieved on any item using one design that has been set up for reverse appliqué by starting at Step 10. Software users, please note when only the word “click” is used it refers to the “left click”. |
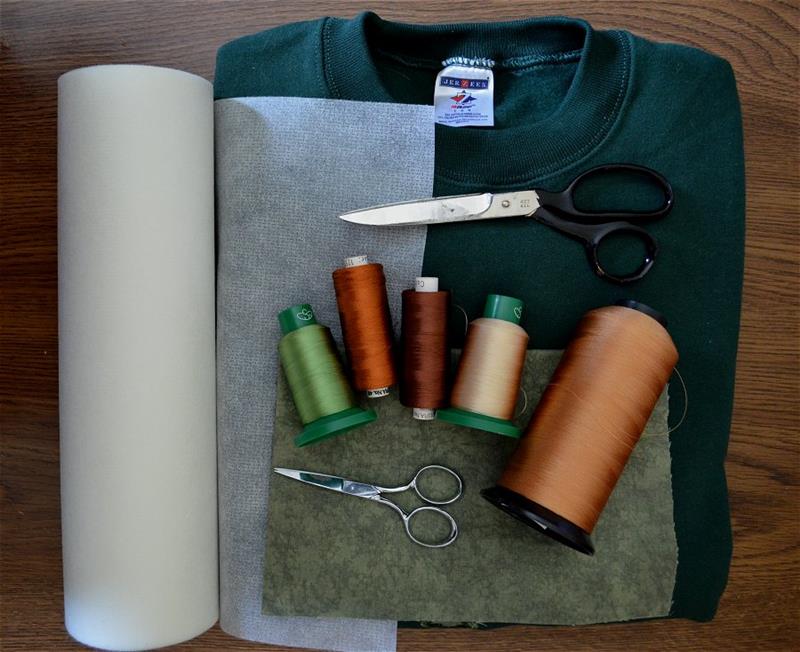
Step 1: | Gather the materials. The appliqué fabric should be in one piece, large enough to cover the sewing area and hoop at least two sides with the garment and stabilizer. Colors are optional. I’m using summer green for the fabric and leaves, but orange, red or yellow could be used for an autumn theme. | 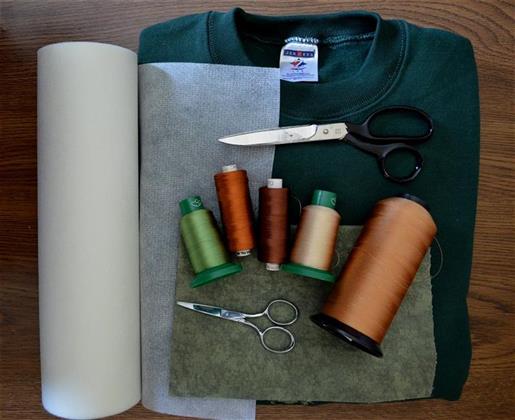 (Click Image to Enlarge) |
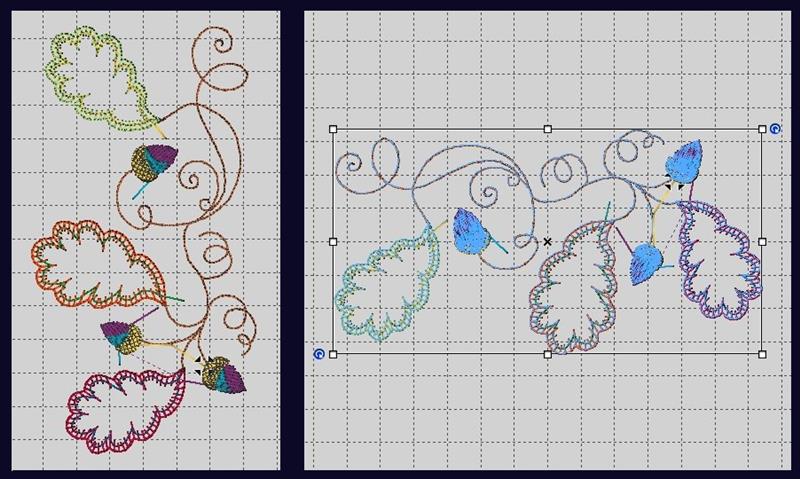
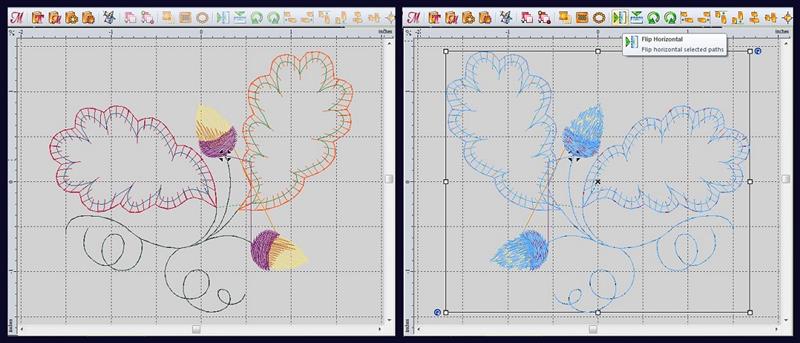
Step 2: | Open the design SC01-QC390 in your editing software. (This design comes rotated vertically most likely to accommodate a common hoop shape and to be easily repeated when used for a continuous border.) First, save the design by clicking on File at the left of the top menu bar and then on “Save As” so that you can choose a new file name, because this will become the new design window and you will avoid writing over the original design file. Rotate the design to sit horizontally so that it will be in the same position as the final sew-out on the sweatshirt. To rotate, use the Select tool to draw a box around the entire design by holding down the left click mouse button at the top left and outside of the design, and drag the cursor down to the outside of the lower right of the design and then let go of the click button. You can then use one of two methods: open the Properties, find “Rotate” and choose (or type in) 90 degrees to the right; or simply grab one of the rotate handles (blue round dot with curved white arrow) at the top right or lower left by holding down the left click button over the handle, and drag to turn the design on its center axis, and then let go of the click button when you have the design in place. To help you balance the design to your preference, turn on the grid (usually found under View options); or if your software allows, you can also drag a guideline down from the top of the design window and/or from the left side by holding your left click button down over the outside edge of the design window and drag to the inside, and then let go of the click button once the guideline is in place. (To remove guidelines, right click over the top of a guideline for a menu to appear that will likely offer the option to delete.) | 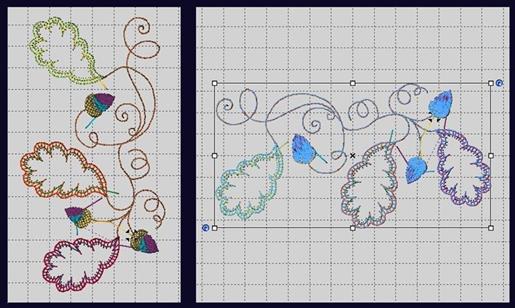 (Click Image to Enlarge) |
Step 3: | Open the design SC01-QC389 and select the entire design. Click on your software’s icon to either “Mirror Horizontally” or “Flip Horizontally”. (If you do not see an icon available for this function, click on Edit in the top menu bar where it might be found as an available command.) | 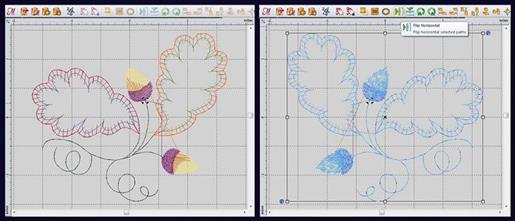 (Click Image to Enlarge) |
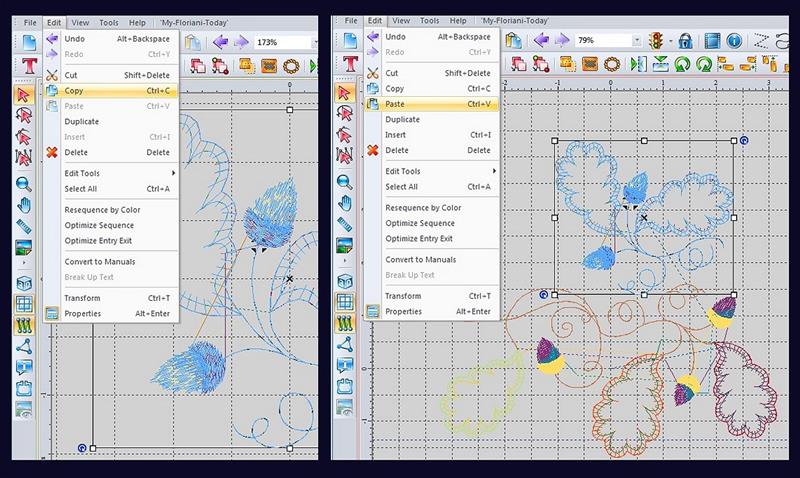
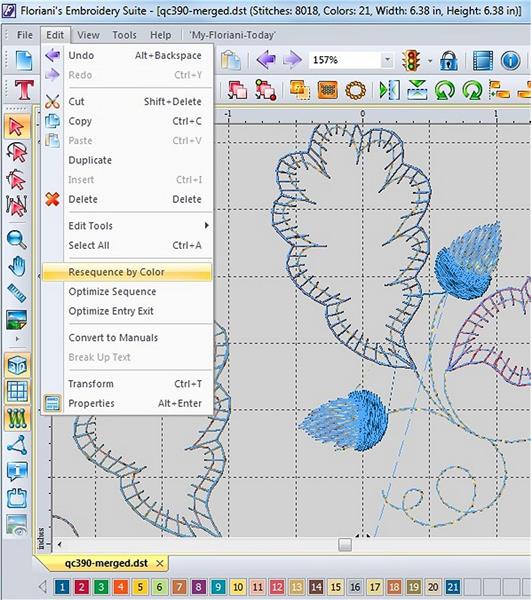
Step 4: | With the design selected, click on the Copy icon or choose the Copy command from the Edit drop down menu (as seen in this image) to place the design in the clipboard. Open the new design window that you had created with the first rotated design. Click on the Paste icon or choose the Paste command from the Edit drop down menu. Move the pasted design into place and rotate until it sits where you prefer. Click on the Save icon (usually designated with a diskette image) or click on File at the left of the top menu bar, and then click on Save. If you are happy with the two merged designs that you have saved as a new design, you can move on to Step 10 and print and/or stitch out a sample. Or you can continue with Steps 5-9 to create additional elements. | 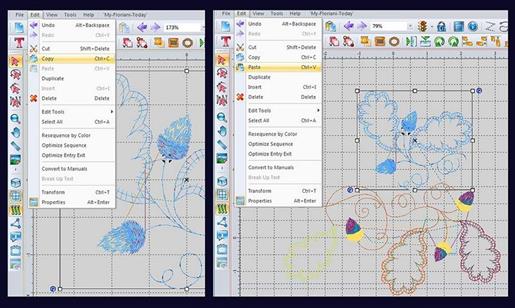 (Click Image to Enlarge) |
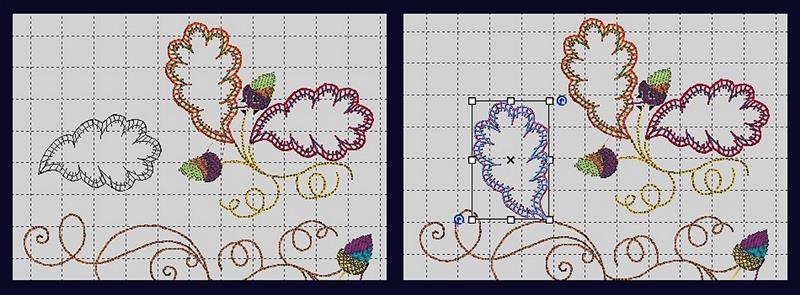
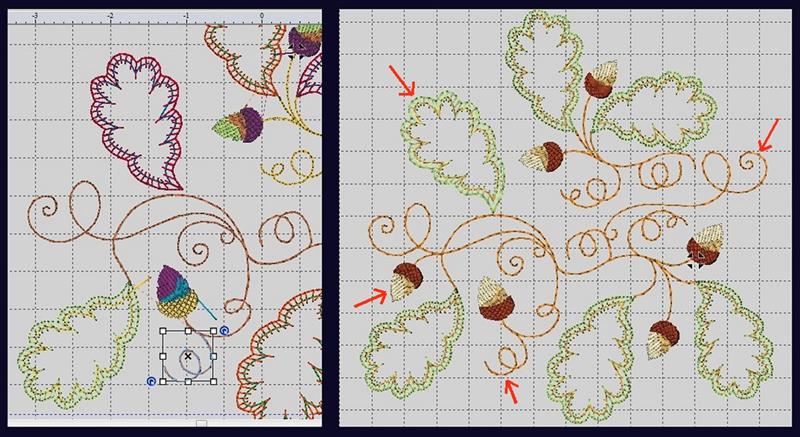
Step 5: | Choose the Lasso Select tool that allows you to select point to point (not in a box) and left click at the outside of the only elements that you want to duplicate; to complete selection, double click or right click, whichever works with your software. After one of the leaf elements has been selected; Copy and then Paste. (Some software programs have a “Duplicate” function which can be used instead of Copy and Paste; select the leaf element and click on Duplicate or macro CTRL +D.) Hold down the left click button over the center X of the selected new leaf, drag into the open space at the left, rotate into place, and then mirror if preferred. | 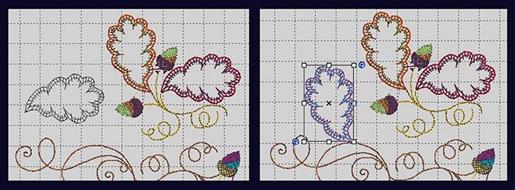 (Click Image to Enlarge) |
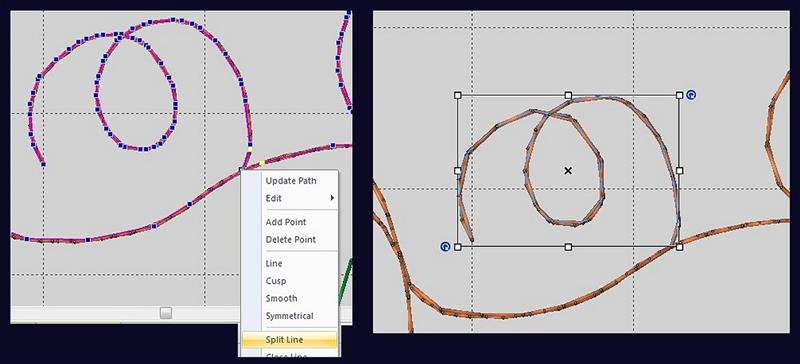
Step 6: | I chose to use this small swirl of the vine to fill in another area, which would be possible if I were working with the original digitized object file, but when trying to select only one small part of the outline in a machine stitch file, very often other sections or even the entire color is selected as one object. Various software programs, such as the one I used, allow you to split outlines in a machine stitch file, in order to delete or duplicate small sections. First select the outline and click on the Shape tool to Edit Outlines which allows viewing the nodes (small blue dots on stitch lines in image). With the cursor placed over a node where you want it to split, right click to bring up the options menu, and then click on Split Line (in some software, similar terms may be used such as Cut, Splice or Detach). This must be done for both lines of running stitch that create the swirl at the point where the swirl begins and stops next to the main vine. The results are a small object that can be selected and duplicated in another area of the design. Click on Copy to place the new object in the clipboard. | 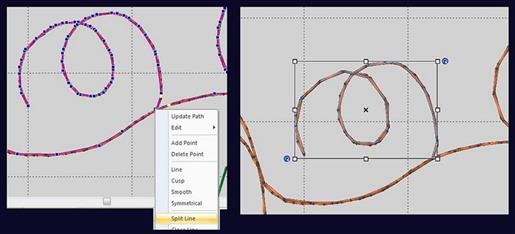 (Click Image to Enlarge) |
Step 7: | Insert new object: Click once on the vine element to select, split on the node where the swirl will begin to stitch. Select the first split section and then click on Insert or Paste and rotate the swirl into place. The insert process might be carried out differently, but similar in other software programs (information regarding the proper steps are usually found under the Help index or manuals). If your software doesn’t allow inserting new objects, they can usually be pasted before that particular color stop or at the end of the design. Keep in mind this will leave long jump stitches as the machine moves off a logical path, but many programs offer a function to resequence colors or stitches, which can be applied at the end of editing for the most efficient path, as explained in the next Step. Image on right shows arrows indicating the objects that were duplicated from the elements of the original design. | 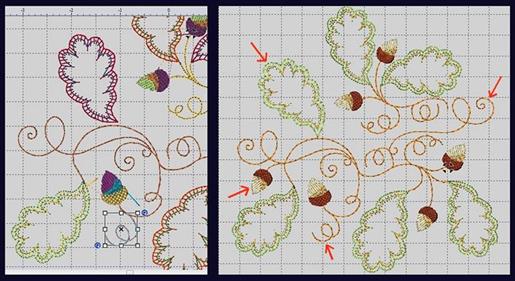 (Click Image to Enlarge) |
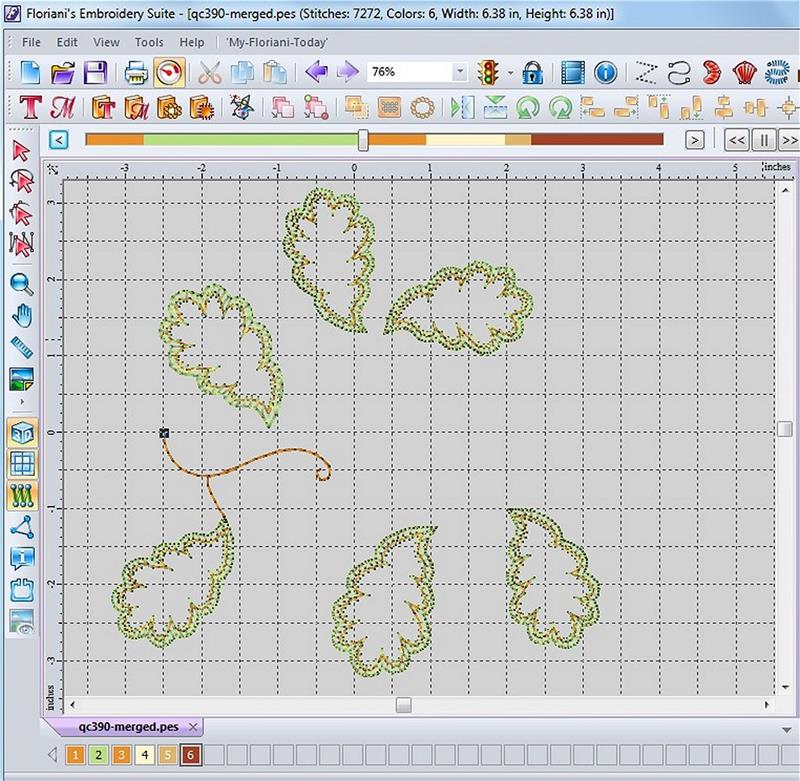
Step 8: | Resequence for the most logical sewing path. To eliminate unnecessary color changes, you should resequence the colors if your software offers that particular function. Make sure all the cut lines of the leaves are set in color #1 and all outlines of the leaves are in color #2. All objects that create the leaves should completely sew before other elements stitch so that the fabric of the garment can be cut out right after all cut lines have stitched and right before the outline stitches of the leaves. Select the entire design and click on Edit and then on Resequence by Color. After resequencing, the color stops in my new design have been decreased from 21 to 6. | 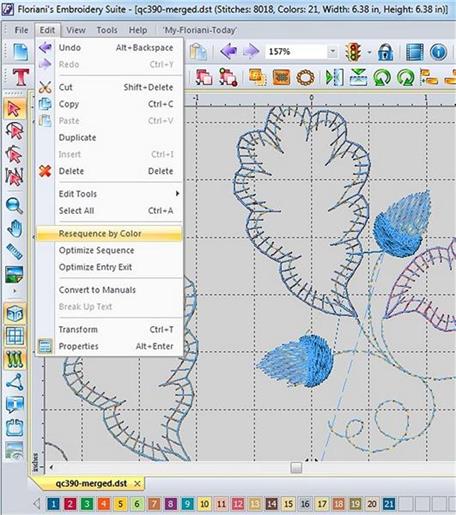 (Click Image to Enlarge) |
Step 9: | Run the design through a simulated sew-out on your software to watch for any illogical sewing. If you are unable to change the sequence of colors or the path in which various elements stitch, you will at least be prepared and know what will stitch where and when, as you watch the sewing at the machine. Center and save the file as your editor’s working\object file to retain newly made objects in case you need to make changes later. Save the file in your machine stitch format and transfer the stitch file to whatever runs the machine, such as a USB drive. | 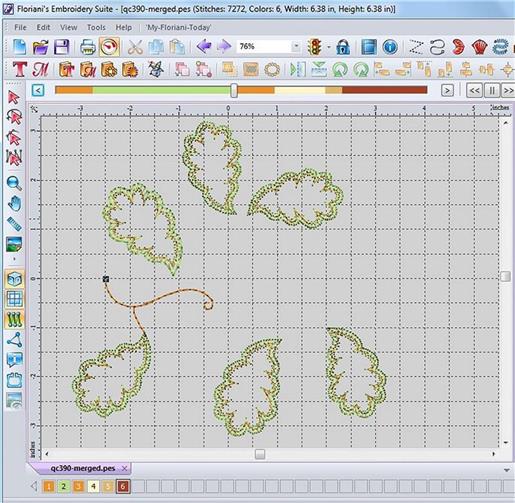 (Click Image to Enlarge) |
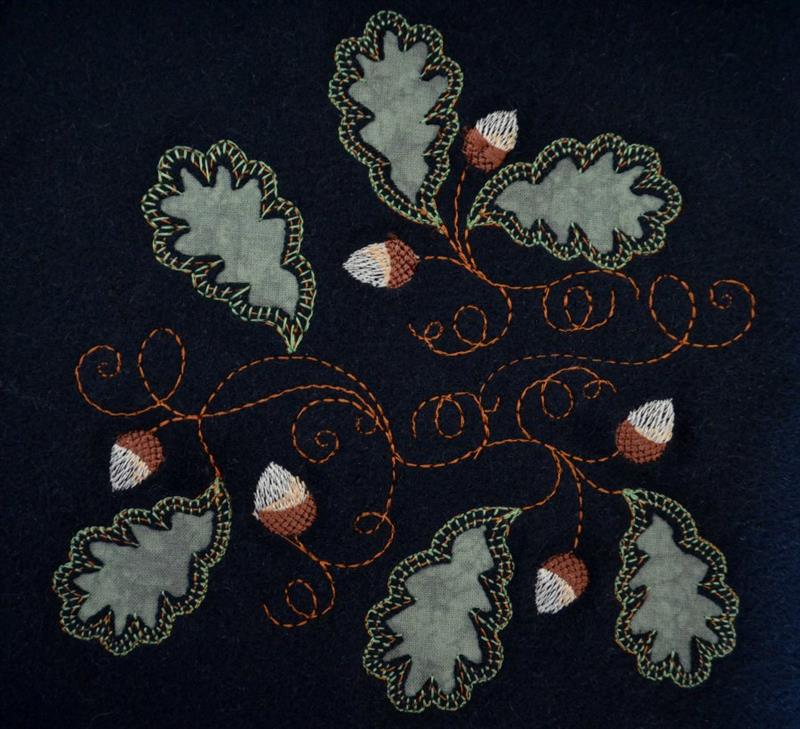
Step 10: | Print out the design to use as a reference for color stops and hoop placement. I also recommend to always sew an actual sample to help judge whether there are issues that need attention, such as improper tensions, a dirty bobbin case or dull needle, but most important, especially when the a design has been edited, to avoid any bad surprises when stitching on the final item. For example, my sewn sample shows that during my editing, the dark brown portion of the very top acorn has lost special diamond pattern stitches that were digitized in the original fill stitches. This type of stitch cannot be recreated quickly in a stitch file even with a high level editing program, but I was able to make the corrections in the software object file by deleting the bad section and then copying and pasting the same section from the original design. The sample also revealed that the new leaf I had added at the top left lost its stitch length value when duplicated or possibly when resequencing, making a very long stitch different than the others. I was able to correct the stitch length in my software’s Properties, but this could also likely be done by copying the leaf element from the original design file and then pasting into the new design to replace the bad leaf. I also was not pleased with the double running stitch vines and light density of the acorns which might have worked well on a lighter fabric, but I wanted a bolder look on the sweatshirt. I was able to use functions in my editing program to increase the density of the acorns and change the stitch type of the vines to a bean stitch. If your editing program doesn’t have the same type of functions, you can also use a 30 WT thread that will offer more coverage of satin stitches and create bolder line stitches. I polished up other issues like stray jump stitches and before saving the new machine file, I rotated the entire design into the position it would sit on the sweatshirt that would be hooped upside down for a commercial machine. (I decided I didn’t need to flip/mirror the design horizontally, but note it would have been necessary if the design had included lettering.) | 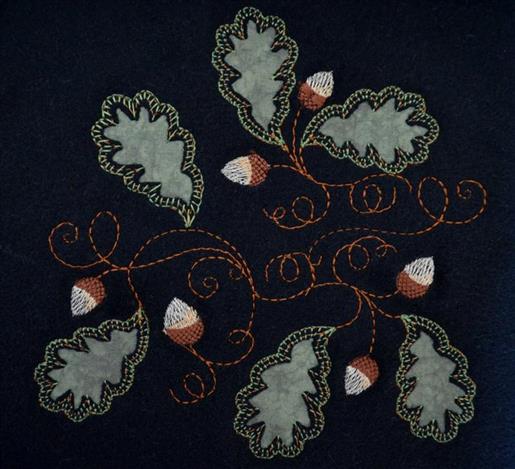 (Click Image to Enlarge) |
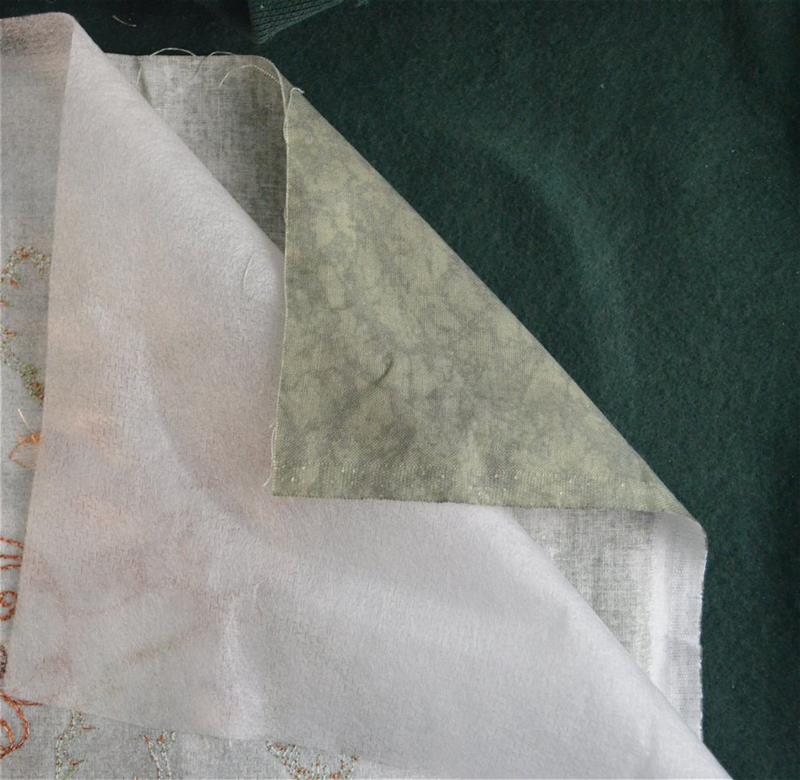
Step 11: | Pin the stitched sample or print out on the front of the sweatshirt where you want the design to be embroidered. Hoop the appliqué fabric with the face of the fabric against the back of the sweatshirt and the cut-away backing up against the back of the appliqué fabric. Be sure that the sample or print out is centered in the hoop before it’s removed. Load the design, set the color stops and start the machine. | 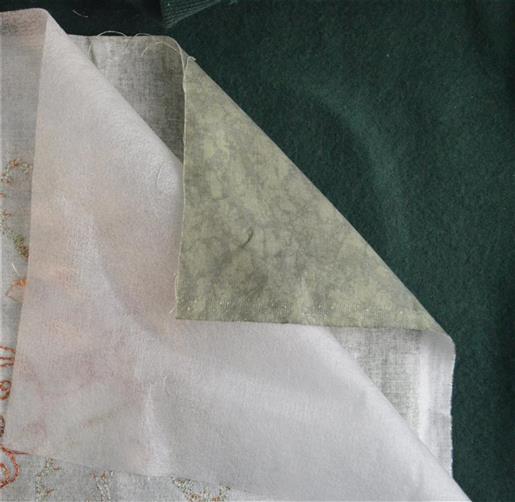 (Click Image to Enlarge) |
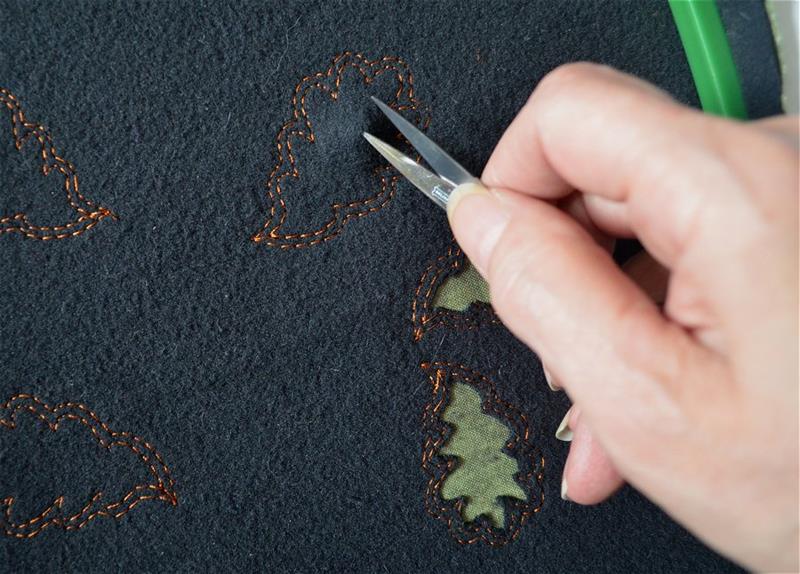
Step 12: | After the first cut lines of Color #1 have stitched around all of the leaves, stop the machine and remove the hooped sweatshirt from the machine, but do not remove the sweatshirt from the hoop. The cutting of fabric should be done at this time so that there is very little chance of accidentally snipping the covering tack down stitches in Color #2. To remove the sweatshirt fabric and expose the appliqué, pinch the fabric at the leaf center and poke the tip of the small scissors into the pinch, and then gently lift away from the appliqué fabric below. Snip out a bit of the center to be sure you are not cutting through the appliqué fabric and then trim close to the inside line of stitches using the small scissors or a larger scissors if they offer better control for you personally. In my sample I also discovered that if I clipped close to the cutline it was too easy to accidentally snip a thread, and in some areas I cut too far from the cutline, resulting in an uneven margin around the inside of the design (see image in Step 10). So when I stitched the sweatshirt, I took care to leave an even margin around the inside by snipping the fabric about 1/8” away from the cut line. | 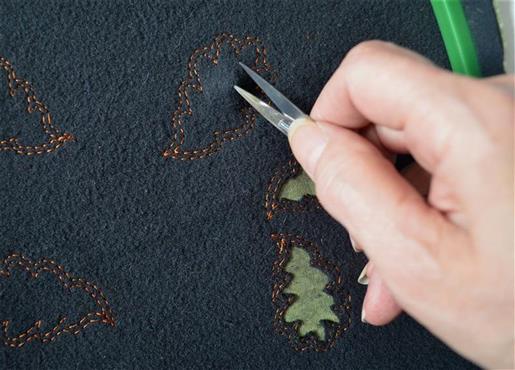 (Click Image to Enlarge) |
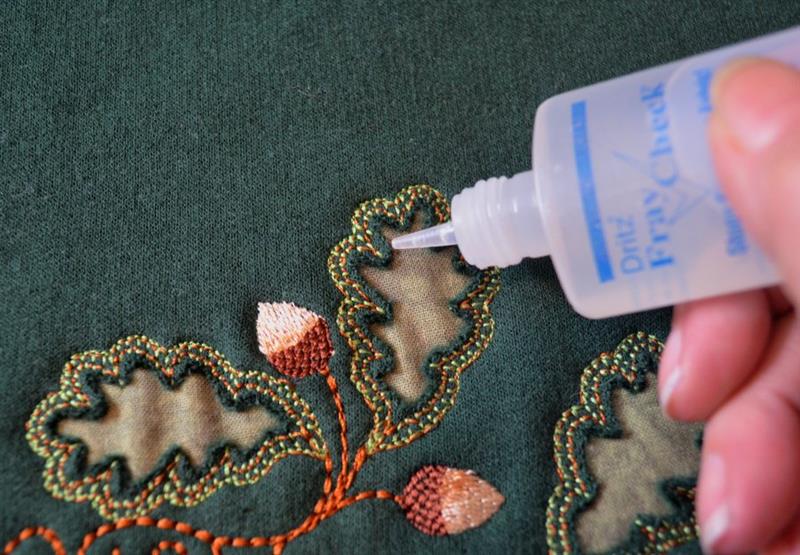
Step 13: | The knit fleece used for a sweatshirt rarely runs, however, to be safe, it doesn’t hurt to use a bit of Dritz Fray Check™ around the raw edges, and let dry for a few minutes. Replace the hooped sweatshirt back into the machine and start the machine. At this point the color sequence should have been set up so that the next color that sews will be the tack down outlines of all leaves. You have just cut away some of the stabilizing foundation of the fabric surface, which could cause the fabric to stretch and shift slightly as it stitches out, so the sooner the raw edges are secured, the less chance there will be of outlines missing their mark. | 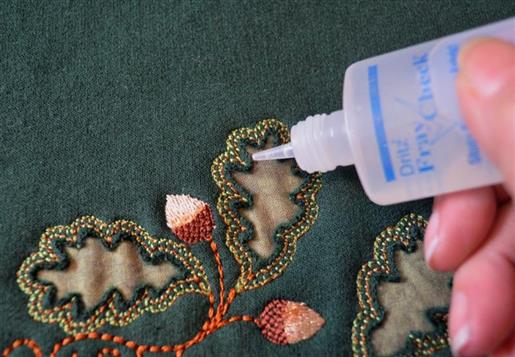 (Click Image to Enlarge) |
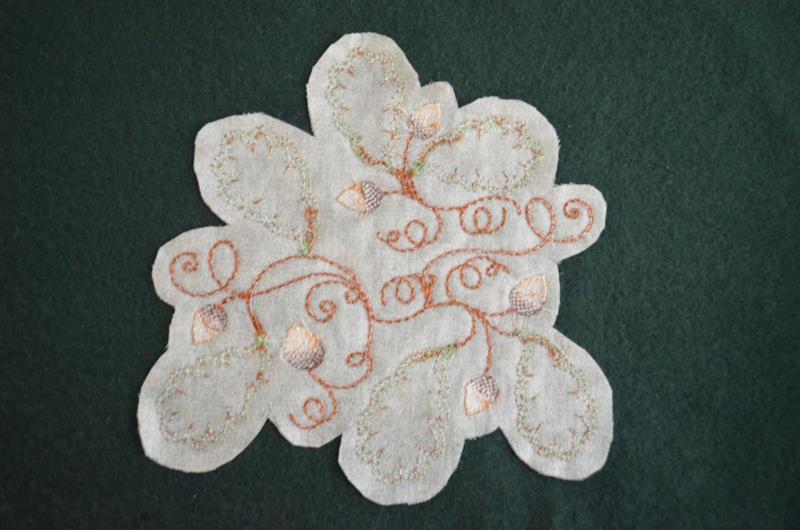
Step 14: | After stitching, remove the sweatshirt from the hoop and turn inside out. On the back, trim the poly-mesh cut-away about ¼” to the outside of the design. The backing does not need to be removed at the inside areas, as the poly-mesh is comfortable to the skin. As well, by leaving some of the stabilizer in place, it will help retain the integrity of the design when laundered. Trim away any long connecting bobbin threads. | 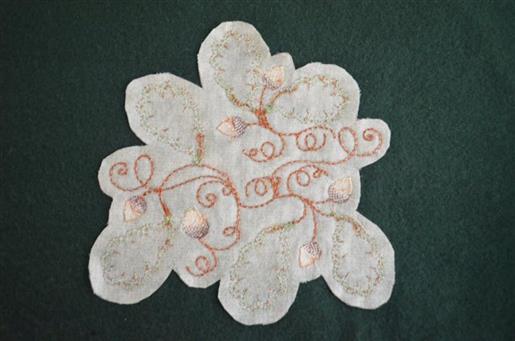 (Click Image to Enlarge) |
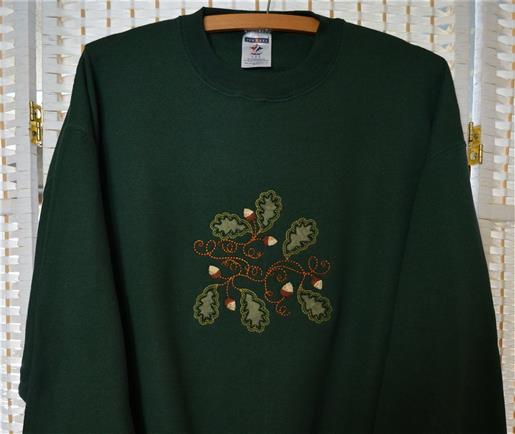
Step 15: | Turn right side out and your original creation is ready to wear! | 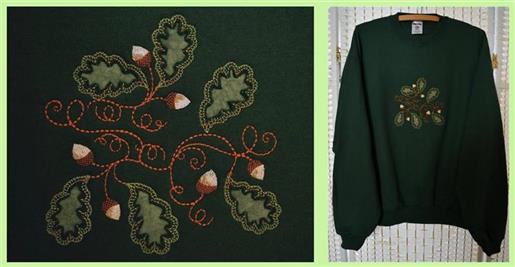 (Click Image to Enlarge) |
|